
Freq51 - The Intermountain Mesh
Meshtastic® lets you use inexpensive LoRa radios as a long-range, off-grid communication platform where regular infrastructure is unreliable or unavailable. It’s community-driven and open source. Radios automatically form a mesh, forwarding packets to neighbors (up to 7 hops from origin). Phones are optional. The Freq51 community is building an open community mesh that anyone here can join. This network is intended as a Radio Frequency tool for emergency/disaster response and off-grid (non-internet) coordination and hobbyist projects. No license is required to use Meshtastic (unless you intentionally enable Ham Mode). Meshtastic is under active development and not a life-critical service.
 |  |
|---|---|
| Idaho | Utah |
Joining
- Get supported hardware from the Meshtastic list.
- Join our Discord for local help and announcements.
- Read the FAQ and Configuration pages below.
- See Equipment for example builds / coverage once published, and Infrastructure for deployed nodes.
Links
- Supported Hardware: https://meshtastic.org/docs/hardware/devices/
- Official Meshtastic Discord –> Connect Forum –> US-Utah
MQTT
MQTT (Message Queue Telemetry Transport) is a lightweight pub/sub protocol. Meshtastic can uplink device info and messages to an MQTT server. This enables:
- Computer ↔ node integrations without using LoRa.
- Uplink/Downlink bridging so two distant nodes can exchange messages via internet when out of LoRa range. We are building a pure LoRa mesh, and do not support MQTT downlink/bridging.
- Maps & analytics (position/telemetry), delivery reports, and tooling. If you want your node on the map.
Our stance: We prioritize a healthy RF mesh first. MQTT is useful for mapping and analytics. Please do not flood the RF network with downlinked internet traffic.
Good practices
- If your node is directly connected to an MQTT server, do not enable downlink on public RF channels (e.g., MediumFast). That can spam RF. Nodes not on MQTT can use “Ignore MQTT,” and that setting is requested to be on by default when operating on our mesh unless you need MQTT. “Ok to MQTT” enabled will allow your node to show up on our MQTT feeders.
Member Projects
Some cool freq51-adjacent projects we love to showcase (add yours!):
- TBD
Submit a PR to add your project here.
Other Local Groups
Meshtastic keeps a running list of local groups worldwide. If you’re traveling or collaborating across regions, check there and cross-link back to freq51 once we’re listed.
- Meshtastic Local Groups Directory: https://meshtastic.org/docs/community/local-groups/
Freq51 Onboarding Guide - Welcome to the Intermountain Mesh!
🎯 Quick Start - Get Connected in 15 Minutes
Welcome to Freq51! This guide will get you up and running on our Meshtastic network.
📦 What You’ll Need
- Hardware: Any Meshtastic-compatible device
- App: Meshtastic mobile app
- Time: About 10–15 minutes
- Location: Utah / Idaho region for best coverage
⚡ Quick Setup
1️⃣ Flash the Latest Firmware
Before configuring your node, make sure it is running the latest Meshtastic firmware.
Use the official web flasher:
https://flasher.meshtastic.org/
Supported devices include:
- RAK devices
- Seeed SenseCAP / Tracker
- XIAO
- Heltec
- Raspberry Pi based nodes
If you need help flashing firmware see the
Firmware Update Guide.
2️⃣ Connect to Your Node
Install the Meshtastic mobile app and connect to your device.
Most nodes connect via:
Bluetooth (recommended)
Alternative connection methods include:
- WiFi
- USB / Serial
Follow the in-app pairing process until you can see your device in the Meshtastic app.
The mobile app is used for pairing and basic device setup. The Freq51 configuration tool will be used next to apply the network settings.
3️⃣ Load Your Freq51 Configuration
Instead of manually configuring dozens of settings, use the Freq51 Auto Config Tool.
Open the configuration tool here: https://tools.freq51.net/config/
Before starting: Your computer must be connected to the node using one of the following methods:
- USB / Serial connection to the device
- WiFi/Wired Connection to the node’s ip address Depending on what type of hardware it is (ESP32/Raspberry pi)
Once connected, the tool will detect your node and apply the correct configuration automatically.
The tool will generate the correct settings for:
- LoRa preset
- Frequency slot
- Freq51 channel
- Hop limits
- Other required network settings
Simply follow the instructions provided by the tool and apply the configuration to your node.
Using the tool ensures all nodes on the network stay compatible and correctly configured.
🏷️ Node Roles - Choose the Right One
Understanding roles is important for maintaining a healthy mesh network.
👤 CLIENT (Recommended for most users)
- Best for: Handheld devices, mobile setups, most users
- Behavior: General-purpose node that rebroadcasts packets only if no other node has already done so
- Visibility: Visible in nodes list/topology
- Use when: This is the default/normal choice
Behavior: General-purpose node that rebroadcasts packets only when needed.
This is the default role most users should choose.
🏠 CLIENT_BASE (Rooftop or strategic clients)
- Best for: Rooftop or other well-placed nodes, that are not quite on Router level.
- Behavior: Node that rebroadcasts packets to/from favorited noded with priority, else acts as client.
- Visibility: Visible in nodes list/topology
- Use when: This is your best placed node or Strategic Client
Behavior: Prioritizes rebroadcasting packets from favorited nodes, otherwise behaves like a client.
🔇 CLIENT_MUTE (Extra or local nodes)
- Best for: Additional handheld devices near better-placed nodes, Car-mounted devices, temporary deployments
- Behavior: Like CLIENT but does NOT forward other devices’ packets at all (no repeating/routing)
- Visibility: Visible in nodes list
- Use when: You have extra handheld/indoor nodes near a better-placed node and want to avoid adding needless rebroadcasts. This is particularly useful with indoor nodes.
Behavior: Does not forward packets from other nodes, helping reduce unnecessary network traffic.
🔄 ROUTER (Advanced infrastructure)
- Best for: Strategically placed infrastructure (mountain/very tall tower with big line-of-sight)
- Behavior: Always rebroadcasts each packet once and is prioritized for routing (“cuts in line” vs other roles)
- Visibility: Visible in nodes list/topology
- Use when: Device is strategically placed to extend coverage for many others
- ⚠️ Important: Misplacing routers increases collisions and wastes hops. Contact the [Discord community] before deploying
- 📖 Detailed Guide: See our comprehensive Router Deployment Guide before considering setting up a router.
Behavior: Always rebroadcasts each packet once and is prioritized for routing.
⚠️ Important
Incorrect router placement can harm network performance.
Before deploying a router please review the guide:
🔄 ROUTER_LATE (Infrastructure - Advanced users only!)
- Best for: Adding reliability/coverage for local clusters without stealing priority
- Behavior: Always rebroadcasts once, but only after all other modes have had their chance (not prioritized)
- Visibility: Visible in nodes list/topology
- Use when: You need a “safety net” for a small area or dead spots without stealing routing priority from better infrastructure
Behavior: Repeats packets after other node types have had their chance.
For a deeper explanation of roles watch this video from The Comms Channel:
https://www.youtube.com/watch?v=htjwtnjQkkE
🗺️ Local Resources
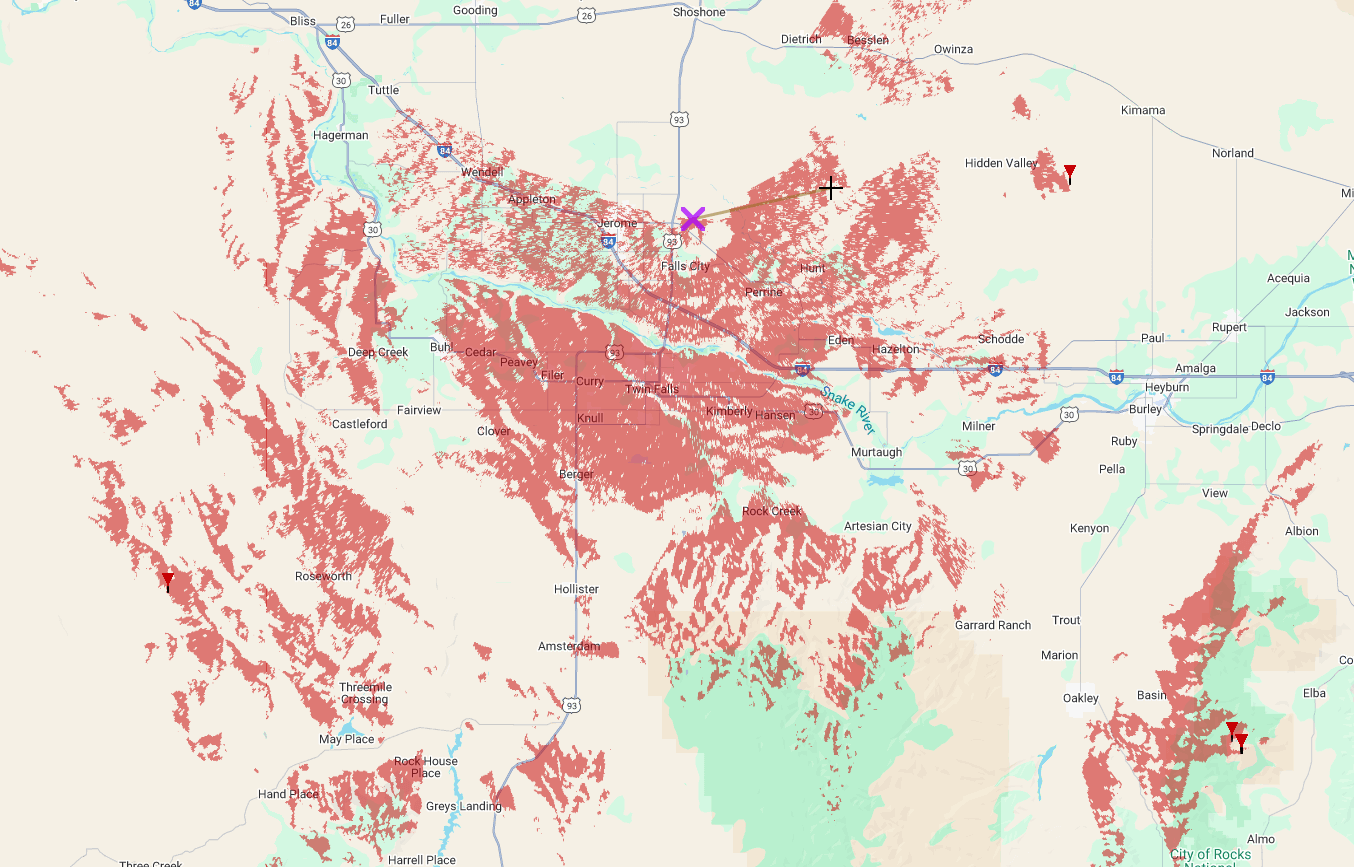
Coverage Areas
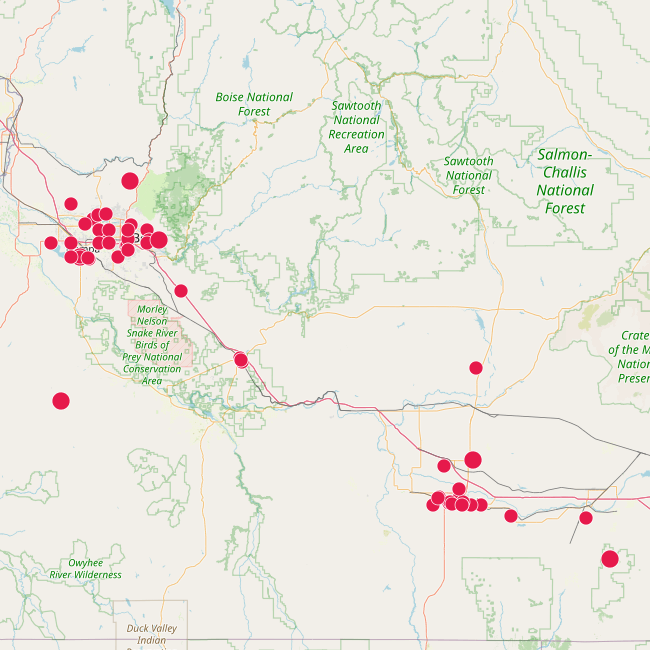
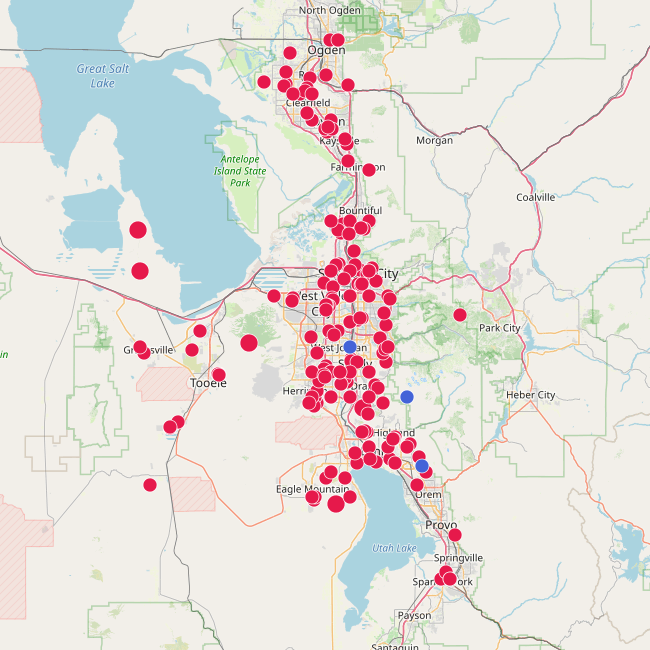
Primary coverage currently includes:
- Salt Lake Valley
- Tooele County
- Utah County
- Boise
- Twin Falls
Growing areas include:
- Davis County
- Weber County
See the Infrastructure page for current node deployments.
💬 Getting Help
The fastest place to get help is our community Discord.
Join here:
https://discord.com/invite/7ANChSNNbW
Members can help with:
- Device setup
- Antennas
- Node placement
- Firmware issues
- Expanding coverage
❓ Quick Troubleshooting
Can’t see other nodes?
- Make sure you used the Freq51 configuration tool
- Verify antenna connections
- Try moving your node to a higher location
- Location broadcasts are intentionally infrequent and may take several hours to appear on the map
Messages not getting through?
- You may be outside mesh coverage
- Check the infrastructure map
- Try a higher antenna placement
- Verify your configuration using the Freq51 config tool
📡 Welcome to the Mesh
Freq51 is a community-built Meshtastic network connecting people across the Intermountain West.
Using the auto configuration tool helps keep the network reliable and compatible for everyone.
👉 https://tools.freq51.net/config/
Questions? Join the Discord and say hello — we’re happy to help! 📡
Migrating Your Node from LONG_FAST (“LongFast”) to MEDIUM_FAST (“MediumFast”)
This guide will walk you through updating your Meshtastic node’s modem preset from LONG_FAST (often called “LongFast”) to MEDIUM_FAST (“MediumFast”) on both iOS and Android. These steps ensure a smooth transition and prevent channel name conflicts.
Why Migrate?
- Network Update: The community is moving to MEDIUM_FAST for improved balance between range and speed.
- Compatibility: Ensures your node stays in sync with the rest of the mesh.
iOS Instructions
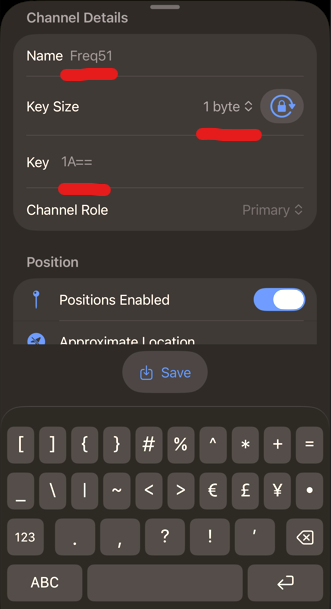
1. Change the Primary Channel Name
- Go to Settings.
- Then select Channels.
- Tap your Primary Channel (Channel ID: 0, typically the name is blank, unless you have changed it in the past, then it would be “LongFast”).
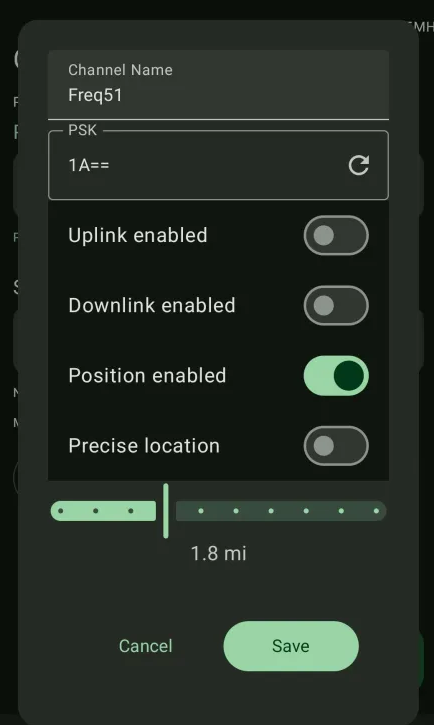
- Change the Channel Name to “Freq51” (without quotes) then adjust the key size to 1byte, and lastly set the key to “1A==” (without quotes).
- Save and confirm the change.
Please note that the channel name has to match exactly, it will not work if it is incorrect.
This step allows us to set a private channel for all the other meshtastic features to function correctly.
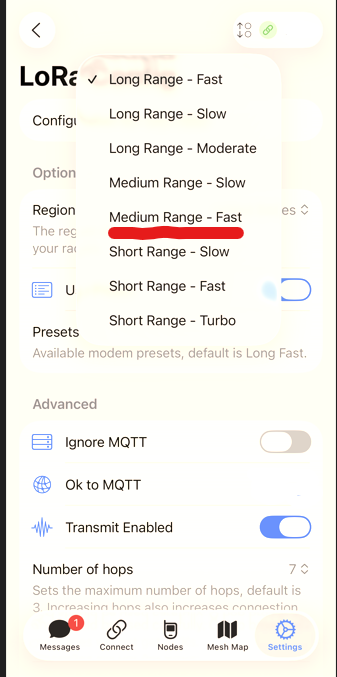
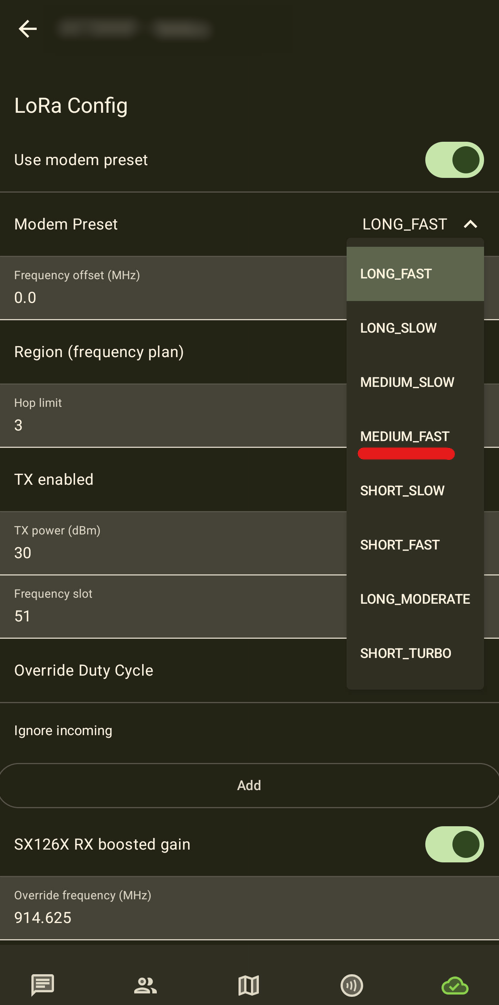
2. Change the Modem Preset and Frequency Slot
- Go to Settings.
- Find LoRa.
- Find presets and select Medium Fast (sometimes shown as MEDIUM_FAST or MediumFast).
- Find “Ok to MQTT” and enable it. This allows your node to be listed on our mesh network stats sites.
- Find “Frequency Slot” and set it to 51. (If not set already)
- Leave “Frequency Override” blank (0). This is for adjusting XCVRs and is not normally needed.
- Save your changes.
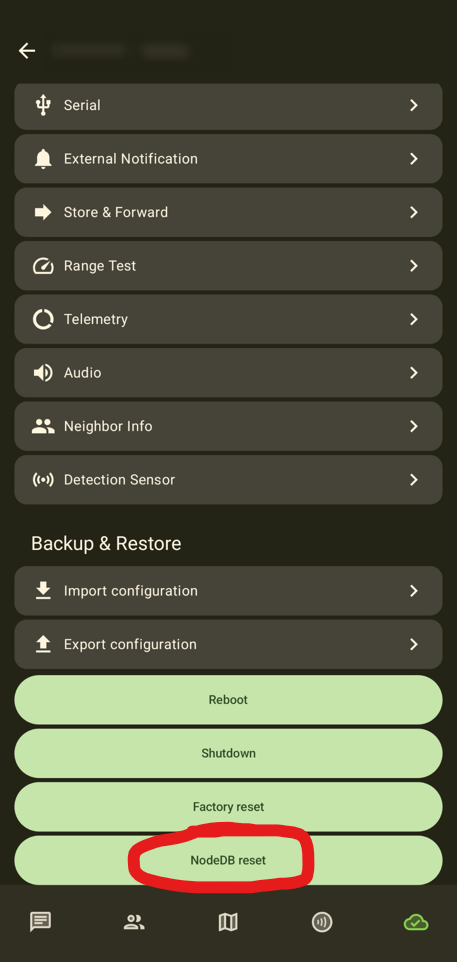
3. Reset Your Node Database (nodedb)
- In Settings, go to Device.
- Locate Reset NodeDB, and click it.
- Your node will restart and rebuild its database for the new modem preset.

Android Instructions
1. Change the Primary Channel Name
- Go to Settings.
- Then go to Channels.
- Tap your Primary Channel (Channel ID: 0, typically the name is blank, unless you have changed it in the past, then it would be “LongFast”).
- Change the Channel Name to Freq51 then set the key to “1A==” without quotes.
- Save and confirm the change.
Please note that the channel name has to match exactly, it will not work if it is incorrect.
2. Change the Modem Preset
- Go to Settings.
- Go to LoRa.
- Find presets and select Medium Fast (may be listed as MEDIUM_FAST or MediumFast).
- Find “Ok to MQTT” and enable it. This allows your node to be listed on our mesh network stats sites.
- Find “Frequency Slot” and set it to 51. (If not set already)
- Leave “Frequency Override” blank. This is for adjusting XCVRs and is not normally needed.
- Save your changes.
3. Reset Your Node Database (nodedb)
- In Settings, under Administration find and select NodeDB Reset.
- Your node will reboot and rebuild its network database.
CLI instructions
- This configuration can be made with the Meshtastic Python CLI. Using the following commands:
meshtastic --set lora.modemPreset MEDIUM_FAST --set lora.channelNum 51
meshtastic --ch-set name "Freq51" --ch-set psk "base64:1A==" --ch-index 0
meshtastic --reset-nodedb
Troubleshooting
- If your node does not appear on the mesh after migration, double-check that the preset is MediumFast and that the primary channel name is Freq51 with the key size as 1byte and Key set to “1A==” No quotes.
- Reboot your node if changes do not appear to take effect.
- Get your node up high (roof/tree) preferably with a clear line of sight to infrastructure.
Need Help?
If you get stuck, please reach out in the community Discord.
Our Equipment
This page will host Freq51 Mesh builds and their approximate coverage maps. Use them to align your setup if you’re inside coverage areas (red). Note that different nodes may run different software. Some builds will run the meshing around BBS system. These are select router nodes with high remote power requirements and recommended to be spaced within 5 hops of each other for consistent relaying. Other nodes are low power. We currently prefer NRF52 based infrastructure nodes for <1W TX power or femtofoxes and Nebra custom miner nodes for 1W TX power. All routers must feature a filter. Filtering is optional on non infrastructure nodes.
Here is a list of hardware many of us use - Freq51 Hardware
NRF52 Mobile Node Example
- SenseCAP Card Tracker T1000-E (Meshtastic)
- SeeedStudio Link
The SenseCAP Card Tracker T1000-E is a compact, NRF52-based mobile Meshtastic node designed for lightweight, on-the-go use. Built around the nRF52840 MCU and an LR1110 LoRa transceiver, it combines low-power mesh communication with integrated GPS/GNSS inside a rugged, credit-card-sized enclosure. Its small size, IP65 rating, and simple charging interface make it ideal as a mobile, personal, or asset-tracking node within an NRF52-based mesh network.
Pros
- NRF52 Platform (nRF52840): Aligns well with NRF52-focused mesh architectures.
- Integrated GPS: Provides location reporting with no external modules required.
- LoRa (863–928 MHz): Compatible with Meshtastic regional configs.
- Ultra-portable: ~credit-card size, lightweight, easy to carry or mount.
- Rugged: IP65 dust/water resistance for outdoor mobility.
- Fully supported by Meshtastic firmware.
Cons
- Battery life depends on GPS + reporting interval (700 mAh internal battery).
- LR1110 radio has partial compatibility limits with older SX127x nodes (mainly receiving).
- Lower TX power and internal antenna = less range than full-sized infrastructure nodes.
- Not suitable as a router node — best for handheld/mobile deployment.
NRF52 Static/Roof Node Example
- RAKwireless WisBlock Meshtastic Starter Kit US915 Base RAK19007 + Core RAK4631
- ABS 7.9“ x 3.9“ x 2.8“ enclosures are a great size/price/quality (or similar).
- Butyl tape OR LEXEL seals antenna passthroughs and is great for making outer seals as lexel sticks to itself (don’t block included gaskets).
- Adafruit bq25185 USB / DC / Solar Lithium Ion/Polymer charger modules are handy for charging packs while radios are disconnected/in storage and its a great small MPPT (remove charge LED for small solar if needed).
- “Soshine” solar panels with regulated 5 V output are convenient and include a mounting pole.
- UV-protect plastics & seal passthroughs: LEXEL has worked well.
- Use the battery connector as a service “switch” inside; add an external waterproof switch only when tool-access enclosures demand it.
- Add a small weep hole on the bottom for pressure equalization and drainage. This is also useful if you have weather sensors. Add a small fabric baffle and place the sensor behind it. We like Bosch BME680’s for weather data.
- Lube gaskets (e.g., silicone grease) to reduce drying/cracking and improve seals.
- After many trials, Alfa 5 dBi omni antennas have been a solid value: short (less wind load), N-male fits through-panel connectors, reliable wide beam.
We are going to fill out standard builds as we improve the documentation. Feel free to drop by the discord and suggest yours
Femtofox Node Example
TBA
Nebra Node Example
PiZero Node Example
TBA
Bird House Node Example
TBA
Tips for placement
TBA
Nebra Miner (DietPi + meshtasticd)
Why repurpose a Nebra?
- Great enclosure & RF path: sturdy case, antenna feedthrough, easy to mount. Many miners are cheap on the used market.
- Linux-native reliability: running Meshtastic on a Pi with
meshtasticdis rock-solid for infrastructure nodes (MQTT uplink, remote admin, logging). - 1 W class radio option: with the community NebraHat (SX1262) from @wehooper4, you get a clean SPI radio layout and a drop-in hardware preset.
What to buy
Minimum parts
- Nebra Outdoor Hotspot enclosure from Ebay. Don’t spend more than $50. The nebra comes with:
- Raspberry Pi CM3
- 32 GB Emmc
- Built-in POE
- Wifi Card & Antenna
- 915Mhz Antenna
- Waterproof Aluminum Enclosure
- NebraHat (SX1262, 1 W) by @wehooper4 (community board). You have to build this yourself or buy from a group buy.
- Right now @bashNinja has about 10 left from a previous group buy.
Nice-to-have
- AHT20 sensor for weather telemetry inside the enclosure.
- A better antenna, such as the a 5dBi Alfa from Rokland.
- A sealant for the enclosure such as Lexel or Permatex
⚠️ Heads-up on other HATs
The pinout on the nebra is different than the standard Raspberry Pi pinout. This makes most hats incompatible unless you fix the pinout.
Quick start (DietPi + meshtasticd)
We’ll use DietPi (Debian 12 base / Debian 13 base) and the official Meshtastic Debian repo for
meshtasticd.
-
Flash DietPi
Grab the DietPi image and flash it to your microSD. First boot, set your basics (hostname, SSH, etc.). -
Enable hardware interfaces
dietpi-config→ Enable SPI and I2C. Reboot.
-
Install dependencies & meshtasticd
*** Debain 12 - Bookworm ***
sudo apt update
sudo apt install -y libgpiod-dev libyaml-cpp-dev libbluetooth-dev openssl libssl-dev libulfius-dev liborcania-dev
curl -fsSL https://download.opensuse.org/repositories/network:Meshtastic:beta/Debian_12/Release.key \
  | sudo gpg --dearmor -o /etc/apt/trusted.gpg.d/network_Meshtastic_beta.gpg
echo 'deb http://download.opensuse.org/repositories/network:/Meshtastic:/beta/Debian_12/ /' \
  | sudo tee /etc/apt/sources.list.d/network:Meshtastic:beta.list
sudo apt update && sudo apt install -y meshtasticd
*** Debian 13 - Trixie ***
sudo apt update sudo apt install -y libgpiod-dev libyaml-cpp-dev libbluetooth-dev openssl libssl-dev libulfius-dev liborcania-dev curl -fsSL https://download.opensuse.org/repositories/network:Meshtastic:beta/Debian_13/Release.key \ | sudo gpg --dearmor -o /etc/apt/trusted.gpg.d/network_Meshtastic_beta.gpg echo 'deb http://download.opensuse.org/repositories/network:/Meshtastic:/beta/Debian_13/ /' \ | sudo tee /etc/apt/sources.list.d/network:Meshtastic:beta.list sudo apt update && sudo apt install -y meshtasticd -
Add the Nebra-Hat/Zebra-Hat radio preset
*** 1W NebraHat ***cd /etc/meshtasticd/config.d/ sudo wget https://raw.githubusercontent.com/wehooper4/Meshtastic-Hardware/refs/heads/main/NebraHat/NebraHat_1W.yaml*** 2W Nebra-Hat ***
cd /etc/meshtasticd/config.d/
sudo wget https://raw.githubusercontent.com/wehooper4/Meshtastic-Hardware/refs/heads/main/NebraHat/NebraHat_2W.yaml
*** 1W Zebra-Hat ***
cd /etc/meshtasticd/config.d/
sudo wget https://github.com/wehooper4/Meshtastic-Hardware/raw/refs/heads/main/ZebraHAT/ZebraHat.yaml
Preset sets SX1262 pins for the NebraHat:
Module: sx1262 DIO2_AS_RF_SWITCH: true DIO3_TCXO_VOLTAGE: true # CS: 8 # (uncomment if needed) IRQ: 22 Busy: 4 Reset: 18 RXen: 25 -
Edit core config
sudo nano /etc/meshtasticd/config.yamlSuggested minimum edits:
General: MACAddressSource: eth0 # or wlan0, or use a fixed MACAddress WebServer: Port: 9443 -
First boot of the service
sudo systemctl enable meshtasticd sudo systemctl start meshtasticd sudo journalctl -u meshtasticd -f -
Optional: Python & CLI tools
sudo apt install -y python3-pip pipx
pipx install "meshtastic[cli]"
pipx ensurepath
pipx install contact
pipx ensurepath
Verify:
meshtastic --host 127.0.0.1 --info -
Use the Web UI
- Visit
https://<pi-ip>:9443/(accept the self-signed cert). - Set Region = US, Short/Long Name, and your Primary Channel (Leave this blank).
- Visit
Role & channel recommendations (local norms)
- Most users: These are usually static and outside so choose:
CLIENT. - Infra: Always add an RF filter on infrastructure nodes; always talk with the rest of the Freq51 community before setting a
ROUTER. - Primary: Leave The name Empty; Secondary: N/A
Fitting it in the Nebra enclosure
- Remove the old lora module.
- Remove the USB board on the 40-pin header; seat the NebraHat on the 40-pin header.
- Route the short SMA pigtail from the hat to the enclosure’s bulkhead connector.
- Add a small bandpass filter inline for infrastructure builds.
Troubleshooting
- Radio not detected / -707 init errors
- Confirm SPI enabled; check
/dev/spidev0.*. - Verify the preset pinout (IRQ/Busy/Reset/RXen/CS).
- Confirm SPI enabled; check
- Duplicate MAC complaints
- Set
MACAddressSource: eth0(or pick a fixedMACAddress:).
- Set
- Web UI issues
- Ensure
WebServer.Portis set.
- Ensure
Verifying on the mesh
- From another node, send a direct message to your Pi node.
- In the CLI:
meshtastic --host 127.0.0.1 --infoandmeshtastic --host 127.0.0.1 --nodedbto see neighbors. - On maps/MQTT (if you opt in), confirm you appear and avoid turning on downlink.
Appendix: NebraHat preset (reference)
# Nebra SX1262 Pi Hat - 1W
Module: sx1262
DIO2_AS_RF_SWITCH: true
DIO3_TCXO_VOLTAGE: true
# CS: 8
IRQ: 22
Busy: 4
Reset: 18
RXen: 25
POE Node Build Guide
This guide covers the recommended hardware configurations for POE-powered nodes in the Freq51 mesh network. These builds are designed for infrastructure deployment at high-level repeater sites and valley-level client sites.
Build Configurations
We have two primary POE node configurations:
- Raspberry Pi 4B - Higher performance option with integrated POE
- Raspberry Pi Zero 2W - Compact, cost-effective option
Both configurations support cavity filtering for high-level repeater sites where interference management is critical.
Configuration 1: Raspberry Pi 4B Build
High-Performance Build
Total Cost: ~$275
This configuration uses the Raspberry Pi 4B, with integrated POE Hat, to ensure future compatibility and the ability to run new meshtastic services in the future.
Parts List
Base Components (All Sites)
| Component | Price | Link |
|---|---|---|
| Raspberry Pi 4B | $40.00 | Adafruit |
| Nebra LORA Hat | $25.00 | TBA |
| Waveshare POE Hat | ~$25.00 | Amazon |
| PNY 64GB PRO Elite High Endurance SD Card | $10.00 | Amazon |
| RAK Outdoor Enclosure | $60.00 | Rokland |
| Gizont 45cm Antenna | $26.95 | AliExpress |
| SMA Male to N Female Bulkhead | $6.00 | Amazon |
Base Total: $192.95
Additional Components for Cavity Filter (High-Level Sites Only)
| Component | Price | Link |
|---|---|---|
| SMA Male to SMA Male Pigtail | $2.00 | TBA |
| Cavity Filter | $80.00 | TBA |
Filtered Build Total: $274.95 (Base + Cavity Filter components)
Configuration 2: Raspberry Pi Zero 2W Build
Recommended Budget Build
Total Cost: ~$234
This configuration uses the Raspberry Pi Zero 2W with a POE adapter for a compact, affordable deployment.
Parts List
Base Components (All Sites)
| Component | Price | Link |
|---|---|---|
| Raspberry Pi Zero 2W | $15.00 | DigiKey |
| Nebra LORA Hat | $25.00 | TBA |
| POE Adapter | ~$9.00 | Amazon |
| PNY 64GB PRO Elite High Endurance SD Card | $10.00 | Amazon |
| RAK Outdoor Enclosure | $60.00 | Rokland |
| Gizont 45cm Antenna | $26.95 | AliExpress |
| SMA Male to N Female Bulkhead | $6.00 | Amazon |
Base Total: $151.95
Additional Components for Cavity Filter (High-Level Sites Only)
| Component | Price | Link |
|---|---|---|
| SMA Male to SMA Male Pigtail | $2.00 | TBA |
| Cavity Filter | $80.00 | TBA |
Filtered Build Total: $233.95 (Base + Cavity Filter components)
Alternative Component Options
Enclosures
- Nebra Enclosure: $32.06 - AliExpress (missing plugs)
- NEMA Steel Enclosure: $29.99 - Amazon (unproved for weather resistance, will need a custom mounting solution)
- NEMA ABS Enclosure: $21.99 - Amazon (plastic)
Antennas
- Gizont 45cm: $26.95 - AliExpress - Recommended
- ALFA AOA-915-5ACM 5dBi: $17.97 - Rokland
Lightning Protection
- Proxicast Coaxial Lightning Arrester: $19.95 - Amazon
Pigtails
- IPEX/u.fl to N Type Female: $6.00 - Amazon
- SMA Male to N Female Bulkhead: $6.00 - Amazon
Assembly Notes
- POE Power: Use the appropriate POE adapter for the Zero 2W or integrated POE Hat for the 4B
- Cavity Filters: Strongly encouraged for all high-level repeater sites to make it easier to hear quieter nodes.
- Weatherproofing: Ensure all cable entries are properly sealed, using something like Permatex
- Grounding: Proper grounding is essential for lightning protection
- SD Card: Use high-endurance cards rated for continuous operation
Additional Resources
Zeus Protection: Protecting Your Meshtastic Node from Lightning Strikes

Lightning strikes are a serious threat to any outdoor electronics, including your Meshtastic node. While nothing can guarantee absolute protection (Zeus always has the last word!), you can dramatically reduce your risk by using proper hardware and best practices.
Why Worry About Lightning?
- Lightning can induce massive voltages in antennas and cables—even if it doesn’t strike directly.
- Damage can travel through antenna cables and power lines, destroying your radio and even other equipment.
- Well-chosen protection can save your gear and even prevent fires.
Core Protection Hardware
-
Lightning Arrestor (Coaxial Surge Protector)
- Install an inline lightning arrestor between your antenna and your node’s radio.
- Look for models rated for your frequency (e.g., 400-470 MHz for Meshtastic).
- Example: PolyPhaser IS-B50LN-C2 or ALPHA DELTA ATT3G50U.
- Arrestors need to be properly grounded to be effective!
-
Grounding Rod
- Connect the lightning arrestor to a dedicated ground rod driven several feet into the earth.
- Use thick copper wire (at least 10 AWG, or 6mm²) for the ground connection.
- Keep the ground wire as short and straight as possible.
-
Antenna Placement
- Mount antennas away from the highest points on a building if possible.
- Avoid mounting directly atop metal masts unless properly grounded.
-
Ferrite Beads/Chokes
- Add ferrite beads to power and data cables entering your node enclosure.
- This helps suppress voltage spikes from nearby lightning.
-
Weatherproofing
- Use weatherproof enclosures to protect against water ingress, which can worsen lightning damage.
- Seal all cable entries.
Installation Example
- Mount your antenna securely.
- Attach one side of the lightning arrestor to the antenna cable.
- Attach the other side to your Meshtastic node’s radio input.
- Connect the arrestor’s ground terminal to your ground rod using thick copper wire.
- Add ferrite chokes to the power cable before it enters the enclosure.
Additional Tips
- Disconnect during storms: If possible, unplug antennas and power during severe weather.
- Inspect periodically: Check ground connections and arrestors for corrosion or damage.
- Insurance: Consider insuring expensive network nodes or setups.
Can You Really Protect Against Zeus?
Nothing is foolproof—lightning is unpredictable and immensely powerful (just ask Zeus!). But good grounding and surge protection make a huge difference, turning a likely catastrophe into a survivable event.
Stay safe, and may your mesh be ever resilient!

Meshtastic Configuration
These sections help you choose settings that work well for you and for the mesh. See the FAQ for troubleshooting. Locally we’re still building out on the FS51 with the default MediumFast North America slot/preset (see below), but freq51 may coordinate short-term trials (e.g., ShortFast) as needed.
Freq51 Medium Fast (As of 10/05/2025):
- Medium_Fast preset, slot 51 → 914.625 MHz
Exact slot counts and defaults depend on preset; see Meshtastic docs for details.
Default Configurations (We are not using this)
By default, fresh Meshtastic radios on NA region can talk on LongFast (channel name) using the LONG_FAST preset and default slot. A typical setup is a radio paired to your phone via Bluetooth. No internet is required. When out of direct range, your messages hop across other nodes.
Understanding “hops”
A hop is a relay through another node. Use the lowest hop limit that reliably reaches your contacts. The default 3 hops can cover many miles in dense meshes, but higher hops increase airtime and congestion. If you wish to see the entire mesh, set your radio to 7 hops. We can handle the extra congestion for now.
Understanding Rebroadcast Logic and Role Priorities
Understanding how rebroadcasting works in Meshtastic helps avoid network congestion and explains why Router roles should be used carefully.
For more info on how roles work and what is suggested based on the node use case please watch this video by The Comms Channel
Contention Windows
- Clients and Routers/Repeaters do not share the same contention window.
- Clients and Router_Lates (RLs) do share a window — but RLs will defer to the end of the contention window if they hear another node.
Simplified Priority Order
- Router & Repeater
- Rebroadcast first.
- Clients (Client, Client Hidden, Client Mute, Client Base)
- Rebroadcast after Routers/Repeaters, but cancel if they overhear another rebroadcast.
- Router Late (RL)
- Rebroadcasts last, only if no one else has already done so.
Detailed Rebroadcast Logic
When a packet is received:
- Check hop limit
- If
hop_limit = 0, do not rebroadcast.
- If
- If I am a Router or Repeater:
- Wait a small random delay, (weighted shorter if SNR is poor).
- Wait until the channel is clear.
- Transmit.
- If I am Client Base AND packet is to/from favorited node:
- Follow Step 2 rules
- If I am not a Router or Repeater:
- Wait until after the maximum possible Router/Repeater delay.
- Add a slightly longer random delay (weighted shorter if SNR is poor).
- If another node rebroadcasted and I am not Router_Late → cancel rebroadcast.
- Otherwise transmit.
- If I am Router Late:
- If another rebroadcast was heard:
- Wait until after all other possible delays, then add another random delay (scaled by SNR).
- Transmit only if the channel is still clear.
- If another rebroadcast was heard:
Why This Matters
- Routers and Repeaters go first → they form the backbone of coverage.
- Clients go second → they fill in only if no Router/Repeater is nearby.
- Router Lates go last → a safety net to ensure delivery without creating echo storms.
Implementation Notes
Most of this logic is implemented in:
RadioLibInterface.cppRadioInterface.cppFloodingRouter.cpp
A flowchart would be an excellent addition here to visualize priority and timing.
Recommended Configurations
If you can’t find a setting in the app, check Meshtastic docs (each page has iOS/Android/CLI/Web tabs).
Router Nodes
Before configuring a router, review the Router Deployment Guide and reach out on Discord.
Use when node is a router
Paths to check (App tabs may vary):
Radio > User, Radio > Device, Radio > Position, Radio > LoRa, Radio > Bluetooth, Modules > Neighbor Info, Modules > MQTT
- Short name: Call sign; 4 Characters; Routers use a specific naming scheme, i.e FPR –> Francis Peak Router
- Long name: Routers use a specific naming scheme, i.e FPR –> Francis Peak Router
- Licensed amateur radio:
FALSE(unless you’re operating in Ham Mode knowingly; encryption is disallowed on ham). HAM band operation is on Frequency Slot 45. Please do not use it on Frequency Slot 51. - Role: Usually
Routerbut can be Router Late depending on placement. Router roles only by coordination. - Rebroadcast mode:
ALL(We want routers to pass all traffic not be a filter) - Node Info Broadcast Interval:
43200s - GPS Mode:
ENABLEDif present, else use Fixed Position. - Fixed Position: Often
TRUEfor stationary nodes (set via CLI or phone). Unless GPS is desired for timekeeping. (really useful) - Position Broadcast Interval:
43200s - Region:
US - Preset:
Medium Fast - Hop Limit:
7 - OK to MQTT:
TRUE(helps appear on map via others’ uplinks) - Telemetry:
1800s per timing interval of attached peripheral - Neighborinfo:
ON, Transmit over Lora ON, 14400 Interval - Required Channels:
Freq51
Note: Neighbor Info is no longer shared across the mesh on an unencrypted primary channel, hence the custom channel name and key.
Router Late Nodes
Before configuring a Router Late, review the Router Deployment Guide.
Paths to check (App tabs may vary):
Radio > User, Radio > Device, Radio > Position, Radio > LoRa, Radio > Bluetooth, Modules > Neighbor Info, Modules > MQTT
- Short name: Call sign; 4 Characters; Routers use a specific naming scheme, i.e FPR –> Francis Peak Router
- Long name: Routers use a specific naming scheme, i.e FPR –> Francis Peak Router
- Licensed amateur radio:
FALSE(unless you’re operating in Ham Mode knowingly; encryption is disallowed on ham). HAM band operation is on Frequency Slot 45. Please do not use it on Frequency Slot 51. - Role:
Router Late - Rebroadcast mode:
ALL(We want routers to pass all traffic not be a filter) - Node Info Broadcast Interval:
43200s - GPS Mode:
ENABLEDif present, else use Fixed Position. - Fixed Position: Often
TRUEfor stationary nodes (set via CLI or phone). Unless GPS is desired for timekeeping. (really useful) - Position Broadcast Interval:
43200s - Region:
US - Preset:
Medium Fast - Hop Limit:
7 - OK to MQTT:
TRUE(helps appear on map via others’ uplinks) - Telemetry:
1800s per timing interval of attached peripheral - Neighborinfo:
ON, Transmit over Lora ON, 14400 Interval - Required Channels:
Freq51
Note: Neighbor Info is no longer shared across the mesh on an unencrypted primary channel, hence the custom channel name and key.
Client / Client Base Nodes (Stationary or Outdoors)
Paths to check (App tabs may vary):
Radio > User, Radio > Device, Radio > Position, Radio > LoRa, Radio > Bluetooth, Modules > Neighbor Info, Modules > MQTT
- Short name: Call sign; 4 Characters;
- Long name: Whatever you wish;
- Licensed amateur radio:
FALSE(unless you’re operating in Ham Mode knowingly; encryption is disallowed on ham). HAM band operation is on Frequency Slot 45. Please do not use it on Frequency Slot 51. - Role:
Client - Rebroadcast mode:
ALL - Node Info Broadcast Interval:
21600s - GPS Mode:
ENABLEDif present, else use Fixed Position. - Fixed Position: Often
TRUEfor stationary nodes (set via CLI or phone). Unless GPS is desired for timekeeping. (really useful) - Position Broadcast Interval:
21600s - Smart Positioning:
OFF - Region:
US - Preset:
Medium Fast - Hop Limit:
7 - OK to MQTT:
TRUE(helps appear on map via others’ uplinks) - Telemetry:
1800s per timing interval of attached peripheral - Neighborinfo:
ON, Transmit over Lora ON, 14400 Interval - Required Channels:
Freq51
Clent Mute Nodes (Mobile or Indoors)
Paths to check (App tabs may vary):
Radio > User, Radio > Device, Radio > Position, Radio > LoRa, Radio > Bluetooth, Modules > Neighbor Info, Modules > MQTT
- Short name: Call sign; 4 Characters;
- Long name: Whatever you wish;
- Licensed amateur radio:
FALSE(unless you’re operating in Ham Mode knowingly; encryption is disallowed on ham). HAM band operation is on Frequency Slot 45. Please do not use it on Frequency Slot 51. - Role:
Client Mute - Rebroadcast mode:
Local Only - Node Info Broadcast Interval:
21600s - GPS Mode:
ENABLEDif present, else use Fixed Position. - Fixed Position: Often
TRUEfor stationary nodes (set via CLI or phone). Unless GPS is desired for timekeeping. (really useful) - Position Broadcast Interval:
21600s - Smart Positioning: No more frequent than ‘30 minutes’
- Region:
US - Preset:
Medium Fast - Hop Limit:
7 - OK to MQTT:
TRUE(helps appear on map via others’ uplinks) - Telemetry:
1800s per timing interval of attached peripheral - Neighborinfo:
OFF - Required Channels:
Freq51
Clent Hidden Nodes (Stealth Nodes)
Paths to check (App tabs may vary):
Radio > User, Radio > Device, Radio > Position, Radio > LoRa, Radio > Bluetooth, Modules > Neighbor Info, Modules > MQTT
- Short name: Call sign; 4 Characters;
- Long name: Whatever you wish;
- Licensed amateur radio:
FALSE(unless you’re operating in Ham Mode knowingly; encryption is disallowed on ham). HAM band operation is on Frequency Slot 45. Please do not use it on Frequency Slot 51. - Role:
Client Hidden - Rebroadcast mode:
Known Only by default. If you have a fresh node stay on Local Only - Node Info Broadcast Interval:
4294967295s - GPS Mode:
ENABLEDif present, else use Fixed Position. - Fixed Position:
OFF - Position Broadcast Interval:
OFF - Smart Positioning:
OFF - Region:
US - Preset:
Medium Fast - Hop Limit:
7 - OK to MQTT:
OFF - Ignore MQTT:
ON - Telemetry:
OFFs per timing interval of attached peripheral - Neighborinfo:
OFF - Required Channels:
Freq51
Get on the Map
To appear on the map:
Channels > Primary
- Allow Position Requests:
TRUE - Approximate Location: choose a value you’re comfortable with
- Precise Location:
TRUE(If wanted)
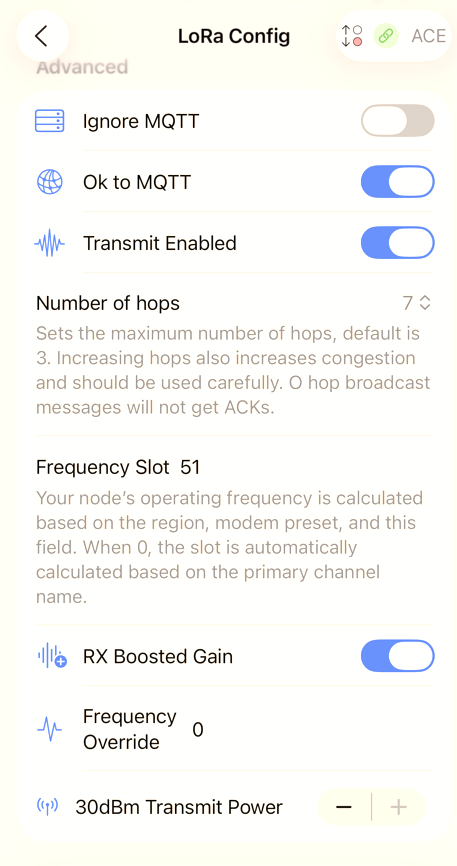
LoRa > Advanced
- Ignore MQTT:
TRUE - Ok to MQTT:
TRUE
If Enabling MQTT (Advanced)
- Uplink Enabled:
TRUE - Downlink Enabled:
FALSE(prevents pulling internet traffic into RF) - Enabled:
TRUE - MQTT Server Address: Message on MediumFast for details or reach out on Discord
- Username/Password: Message on MediumFast for details or reach out on Discord
- Encryption:
TRUE - JSON:
FALSE - TLS:
FALSE - Root Topic:
msh/US/UT - Map Reporting Enabled:
TRUE - Map Report Publish Interval: Fixed
Same as standard config broadcast intervals; Portableno more frequent than 600s - Approximate Location: set as desired
Local Channels
We will not be providing nor publish QR codes or Meshtastic URLs for public channels. They can also change LoRa settings (hop count, OK to MQTT, TX power) invisibly. Enter channel names/keys manually. If you would like to create a channel for a specific purpose but wish it to be public use; contact us and we will add it to the documentation as requested.
MediumFast
Default community channel on Medium_Fast. We use this channel to connect the mesh together on a unified unencrypted channel and also broadcast. This resides in our secondary channels
| Channel Name | PSK | Modem Preset | Slot | Ham Mode |
|---|---|---|---|---|
| Freq51 | 1A== | Medium_Fast | 51 | Off |
DC801
This is the local hackerspace channel. The key is only found at the hackerspace. Come join us!
| Channel Name | PSK | Modem Preset | Slot | Ham Mode |
|---|---|---|---|---|
| ShortFast | access hackerspace for key | LONG_FAST | 51 | Off |
Meshtastic Channel Setup Guide
A guide to setting up private and other channels on your Meshtastic node.
Each channel includes its name, key, and purpose.
Use this to configure your node to connect with local or community networks.
🧭 Table of Contents
- Primary Channel (General Freq51 Mesh)
- Utah Channels
- Idaho Channels
- Emergency Communications Channels
🔹 Primary Channels (General Mesh)
| Channel Name | Role | PSK/Key | Description |
|---|---|---|---|
Freq51 | Primary | 1A== | Main Freq51 mesh network for general users. Enables broad communication across regions. |
MediumFast | Secondary | AQ== | Default Channel: This is used for testing your node on the mesh by sending ping/test messages. |
💡 These are the main channels most users start with. It connects you to the general Freq51 mesh, and provides another channel to test with
🏔️ Utah Channels
Special channels for Utah-based groups and initiatives.
These can be added as secondary or tertiary channels for local coordination and alerts.
| Channel Name | Role | PSK/Key | Description |
|---|---|---|---|
BBBB-Alerts | Secondary | empty | Alerts from FEMA iPAWS/EAS, NOAA, USGS Volcano Alerts, and more. |
DC801 | Secondary | MHHa9wlKe4chJ01SuTKt1RnqbSXv4UJNAP+ONcKfa0c= | DC801 - 801 Labs |
SAINTCON | Secondary | dFa5cC4GuZ9AnFgPKzBjzqO6Ch8doQdOMqzwlmEff0Q= | SAINTCON |
💬 These channels help Utah users receive local alerts and coordinate within their communities.
🌲 Idaho Channels
Special channels for Idaho-based users and organizations.
These can be added as secondary channels to support local groups, alerts, and coordination.
| Channel Name | Role | PSK/Key | Description |
|---|---|---|---|
2ndStarLabs | Secondary | BRdqPvLgcJKPN5BBCHUVxU6YavR11R3HAoy5wSZdSqc= | Channel for members of Second Star Labs Hackerspace in Twin Falls, ID. |
IDAlerts | Secondary | EdYPaoEzYapldDMwSIeYaLuOVhEqAj5S0Hm5owRoWEg= | Alerts from FEMA iPAWS/EAS, NOAA, USGS Volcano Alerts, and more. |
IDEmergency | Secondary | z/N/1qMBO9LubPEQ7tjOZfUrFuRCmni2OosuNgHpgJM= | Monitors public channels for emergency keywords (911, fire, rescue) and relays info here. |
💬 These Idaho-specific channels extend the mesh to local emergency and community networks.
🚨 Emergency Communications Channels (Coming Soon)
These channels are intended for emergency coordination, disaster response, and critical communications. They should only be used for legitimate emergency traffic, drills, or official coordination.
⚠️ Keep messages clear, concise, and relevant. Avoid general chat on these channels.
| Channel Name | Role | PSK/Key | Description |
|---|---|---|---|
| `` | Secondary | empty | `` |
💬 These emergency channels provide structured communication during incidents while keeping the primary mesh available for general traffic.
⚙️ How to Add Channels
- Open the Meshtastic App or use the CLI (
meshtastic --setcommands). - Navigate to Channels → Add Channel.
- Enter the Channel Name and PSK/Key from the table above.
- Choose the Role (Primary or Secondary).
- Save and sync your settings.
💡 Be sure all devices in your group use the same channel name and PSK.
Getting Started
This page lists recommended software for the Meshtastic mesh network: official apps, monitoring tools, web clients and integrations. Software is grouped by platform to help you quickly find what fits your device and workflow.
🧭 Platforms & Apps
Mobile Apps
Android (official Meshtastic app)
- Platform: Android phones/tablets
- Description: Official client for messaging, map display, and node configuration via Bluetooth, USB or WiFi.
- Link: Installation instructions
- Tip: Available via Google Play, F-Droid or sideloading.
iOS / iPadOS (official Meshtastic app)
- Platform: Apple iPhone / iPad / iPod Touch
- Description: Official client for Apple devices — connect to nodes, chat, view maps, configure settings.
- Link: Installation instructions
- Tip: Requires current iOS version; check compatibility in App Store.
Web / Desktop Clients
Web Client (Meshtastic Web)
- Platform: Browser (desktop, laptop, tablet)
- Description: Browser-based user interface that connects to a node via USB/serial, Bluetooth or HTTP. Allows messaging and configuration without using a phone.
- Link: Web Client docs
- Tip: Use the hosted instance or self-host for local control.
Embedded / Device UI
Meshtastic UI (MUI)
- Platform: Dedicated device (Linux-based, touchscreen/display)
- Description: A standalone user interface running on a node or companion device. Ideal for setups where you don’t want to rely on a phone.
- Link: MUI docs
- Tip: Great for repeater hardware, kiosks or outdoor setups.
Command-Line & Scriptable Tools
Python CLI for Meshtastic
- Platform: Windows / macOS / Linux (command line)
- Description: Python package providing CLI and API for automation, telemetry ingestion, scripting node config.
- Link: Python CLI docs
- Tip: Install via
pip3 install --upgrade "meshtastic[cli]". Great for headless servers or Raspberry Pi.
Community / Third-Party Tools & Integrations
Kiba Outdoors
- Platform: Android / iOS
- Description: Outdoor-focused mobile app integrating Meshtastic radios for messaging and location sharing in off-grid scenarios.
- Link: Kiba Outdoors
MeshView (by pablorevilla-meshtastic)
- Platform: Web / Server (Docker/browser)
- Description: Real-time monitoring and diagnostics tool for Meshtastic networks — node status, packet flows, topology.
- Link: GitHub – meshview
MeshSense (by Affirmatech)
- Platform: Desktop (Windows / Linux / macOS)
- Description: Monitoring, mapping and visualizing your Meshtastic network: node health, signal reports, traceroutes.
- Link: MeshSense
Contact (by pdxlocations)
- Platform: Terminal / CLI
- Description: Lightweight terminal-based client for Meshtastic: chat, config, backups via console UI.
- Link: GitHub – contact
MeshMonitor (by Yeraze)
- Platform: Web App (Server + browser)
- Description: Web-based monitor for Meshtastic nodes: maps, analytics, node info via HTTP/TCP.
- Link: GitHub – meshmonitor
Malla (by zenitraM)
- Platform: Web App (Server + browser)
- Description: Lightweight web analyzer: reads Meshtastic packets via MQTT/SQLite and provides dashboards for nodes, traceroutes, maps.
- Link: GitHub – malla
✅ Choosing the Right Software
- Mobile: If you’re handheld or portable, use the official Android or iOS app.
- Desktop / Browser: For laptop/desktop access, the Web Client offers a full experience.
- Embedded Device: Use MUI when you want a dedicated node with built-in UI.
- Automation / Server: For telemetry, scripts or server-side work, go with the Python CLI.
- Monitoring & Analytics: For larger node deployments or network health, use one of the community tools (MeshView, MeshSense, MeshMonitor, Malla).
- Outdoor or group ops: Check Kiba Outdoors for a mobile-centric outdoor-friendly app.
🔗 Additional Resources
- Official Software Index: Meshtastic Software
- Community-Curated List: Awesome Meshtastic
Last updated: October 2025
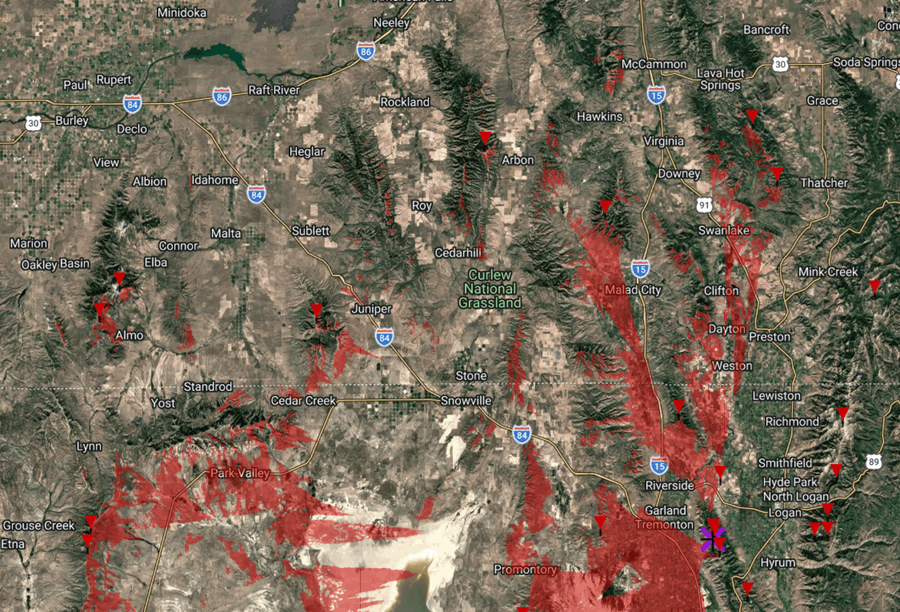
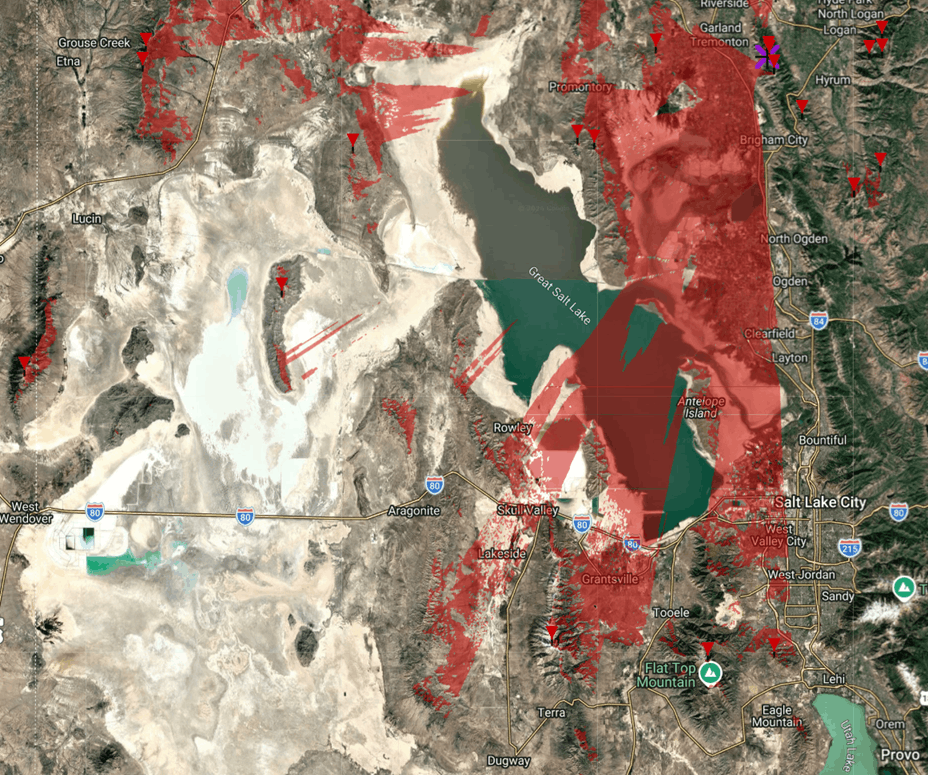
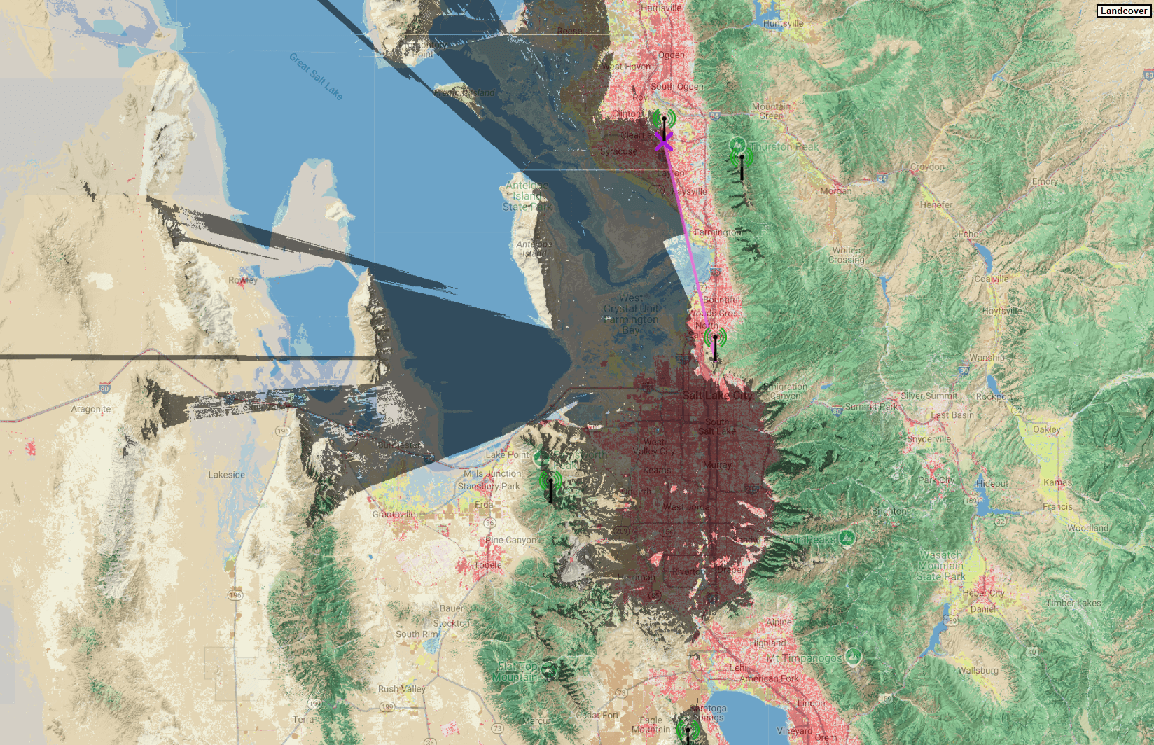
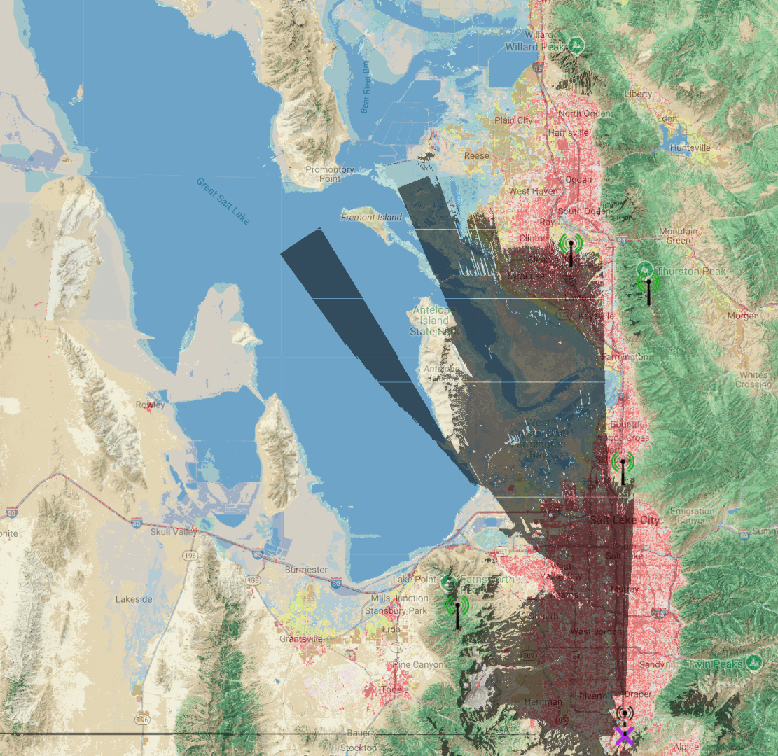
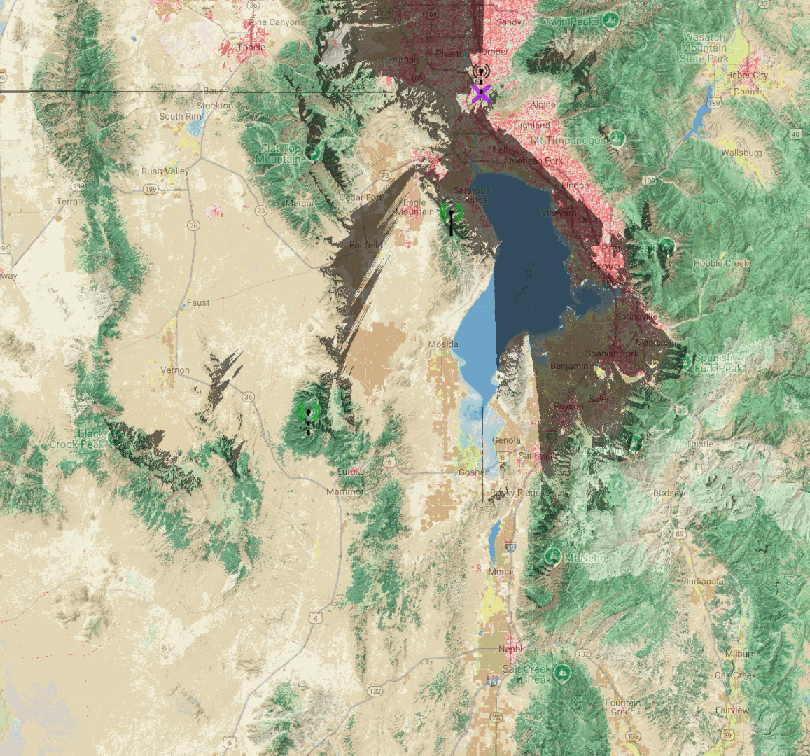
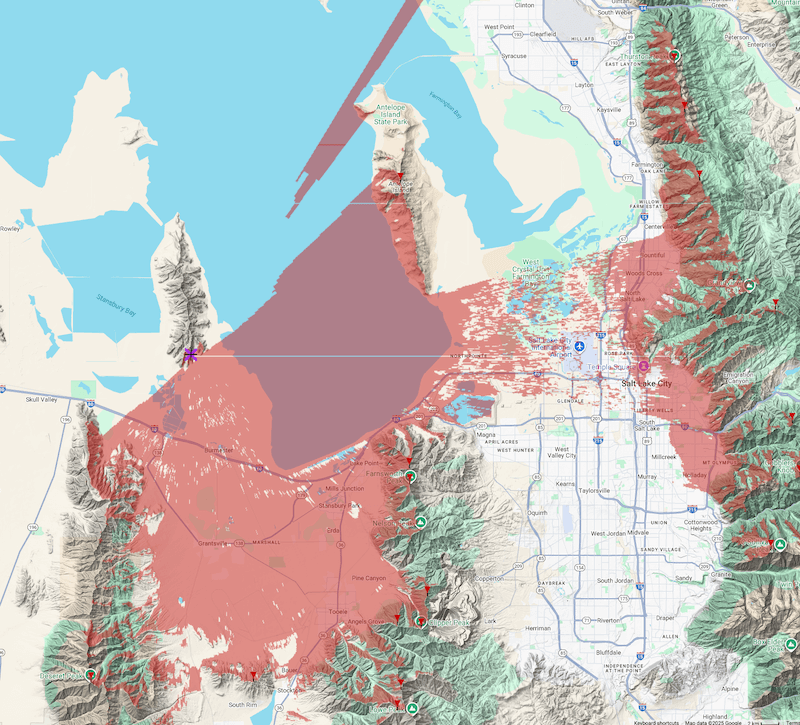
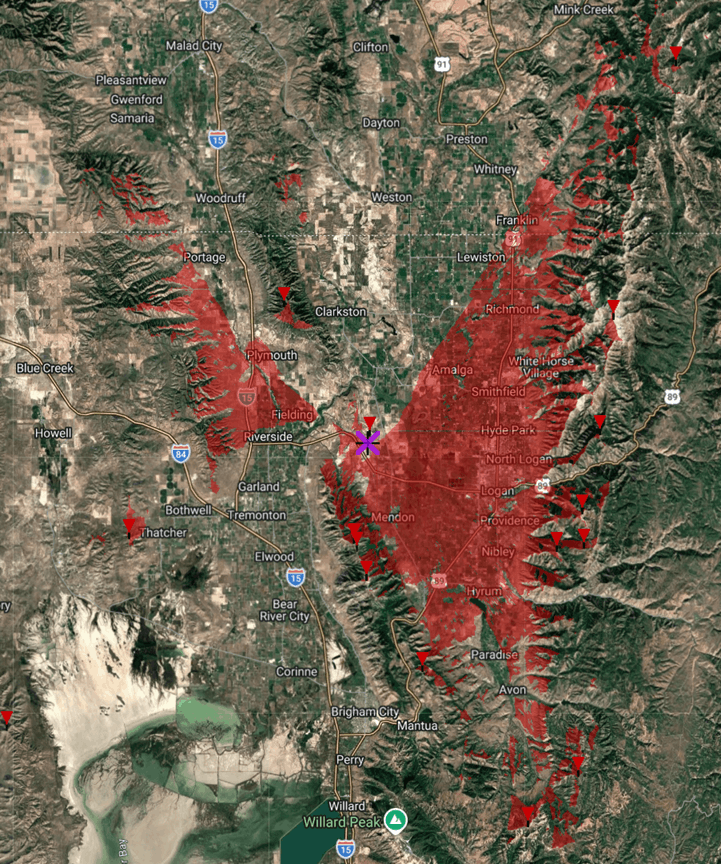
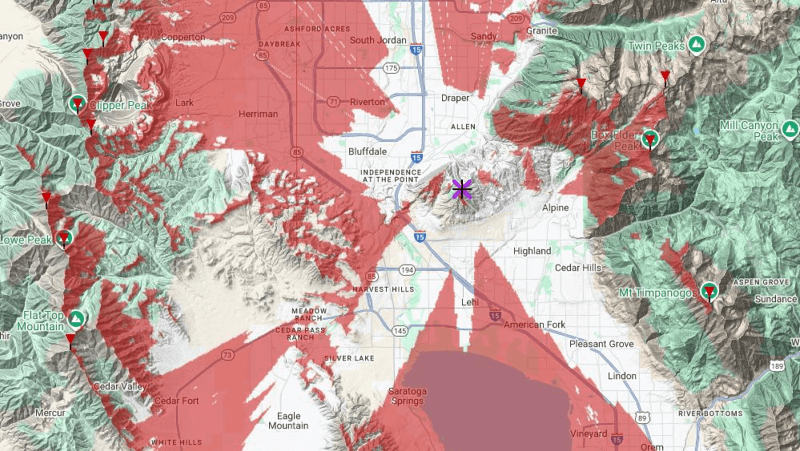
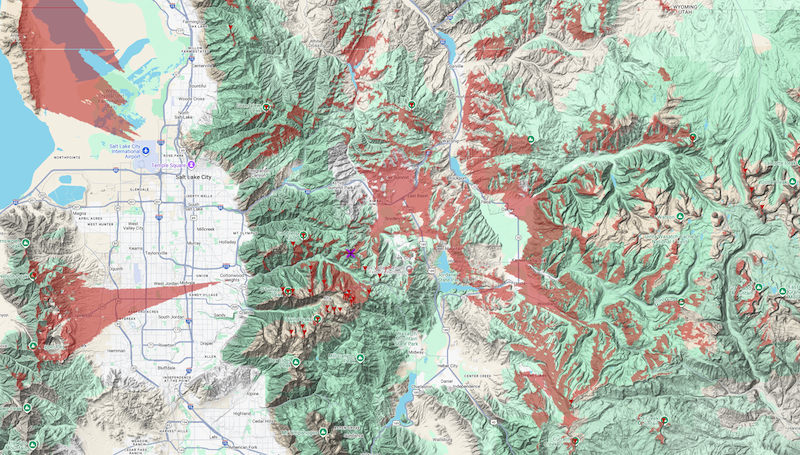
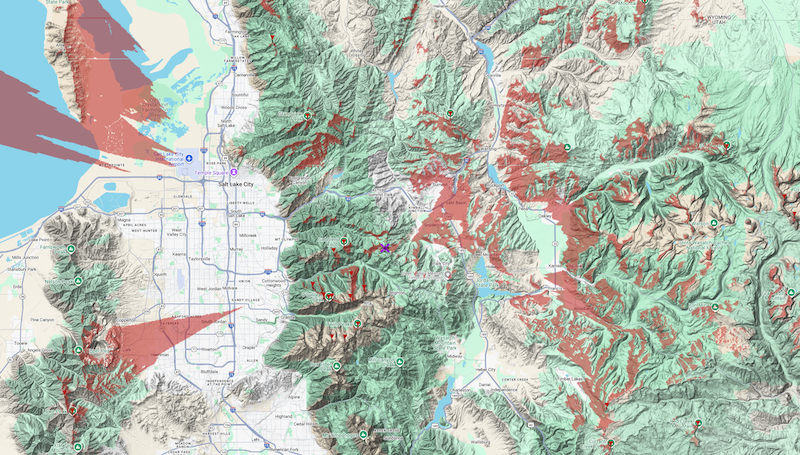
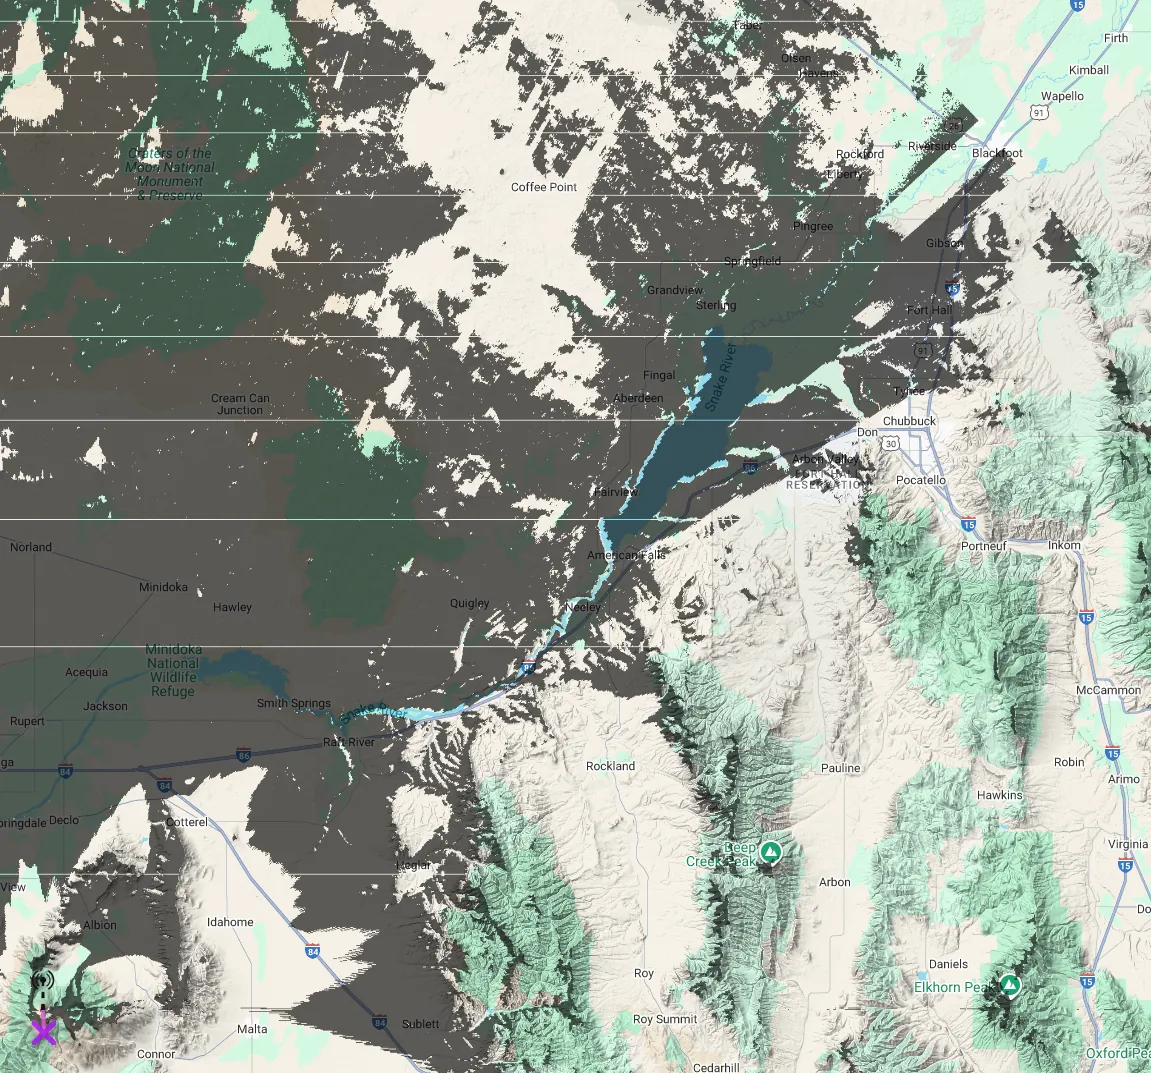
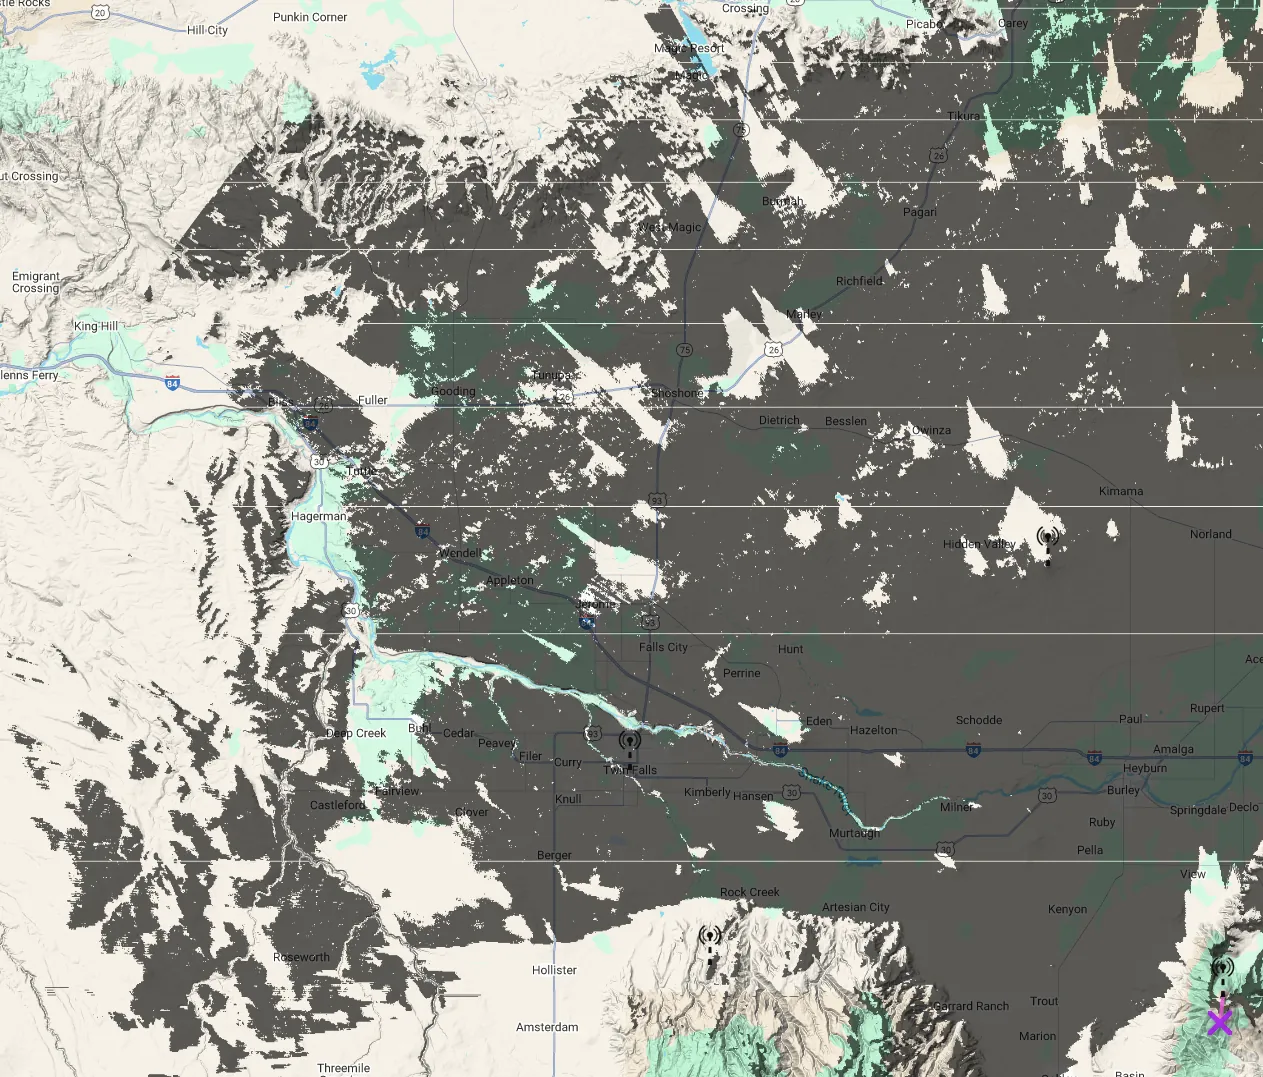
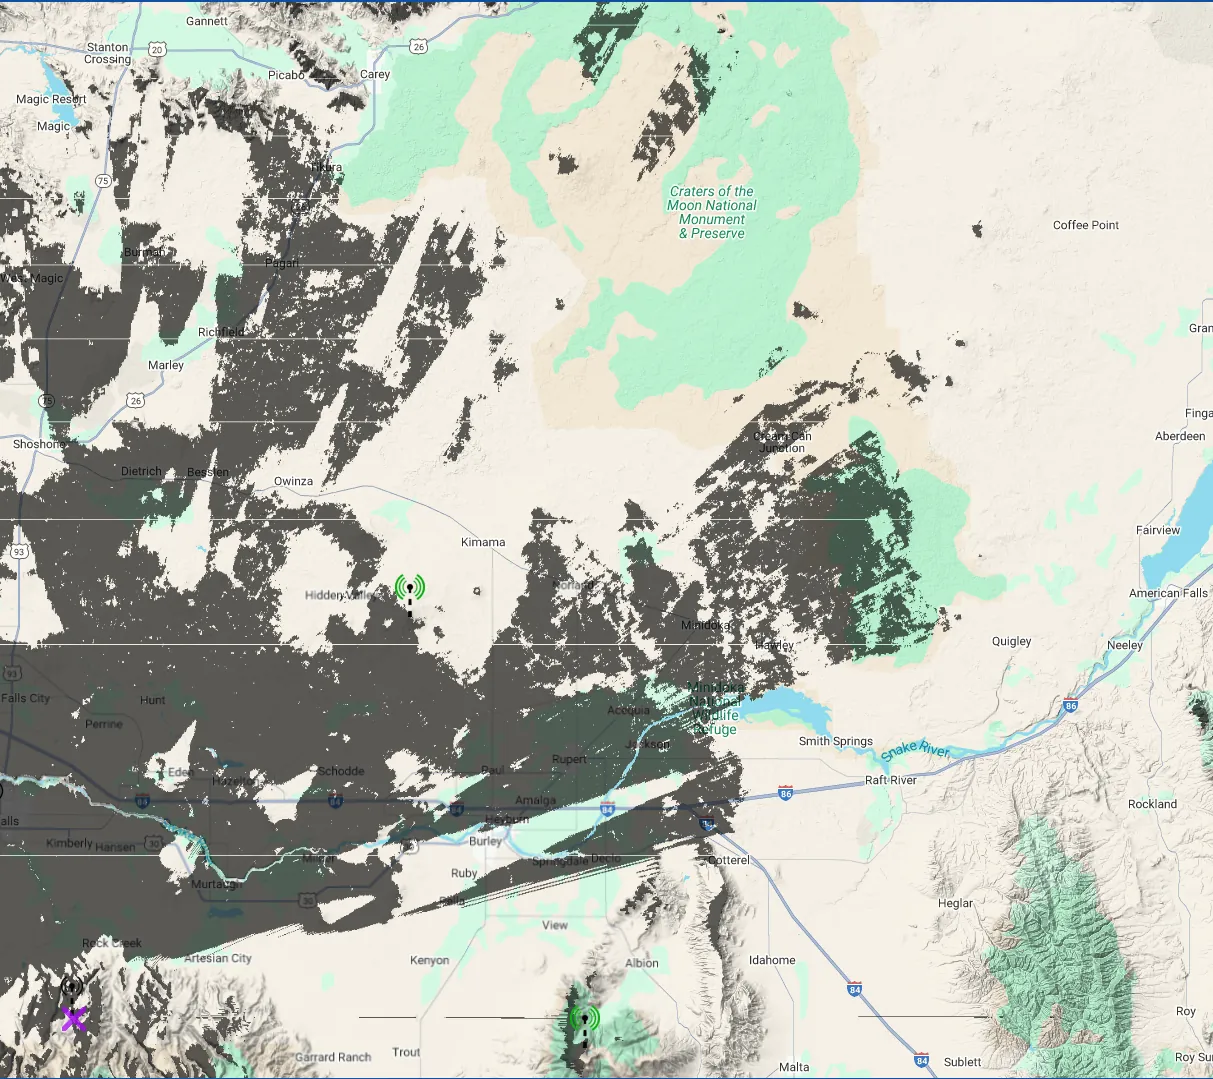
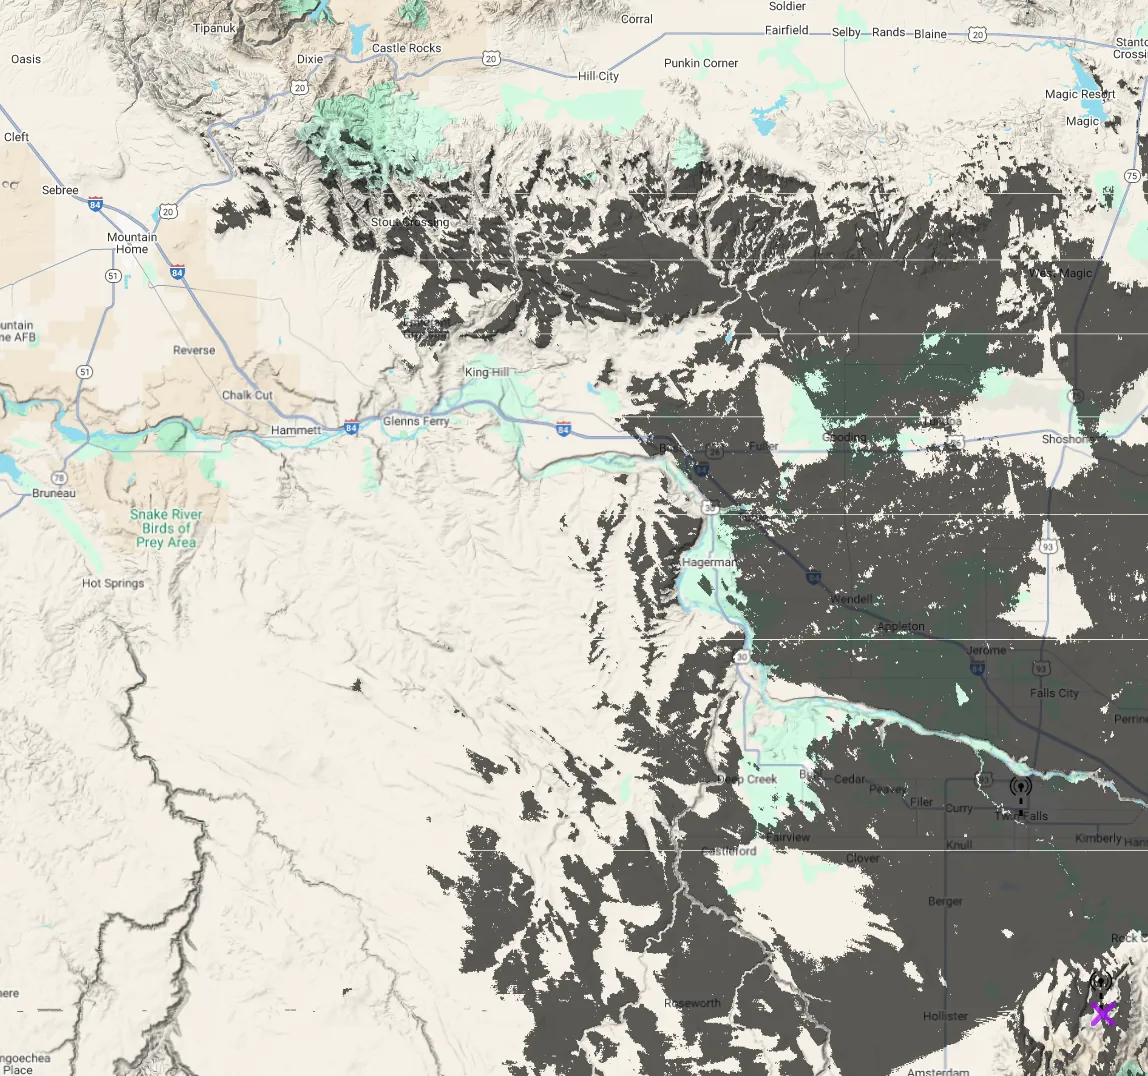
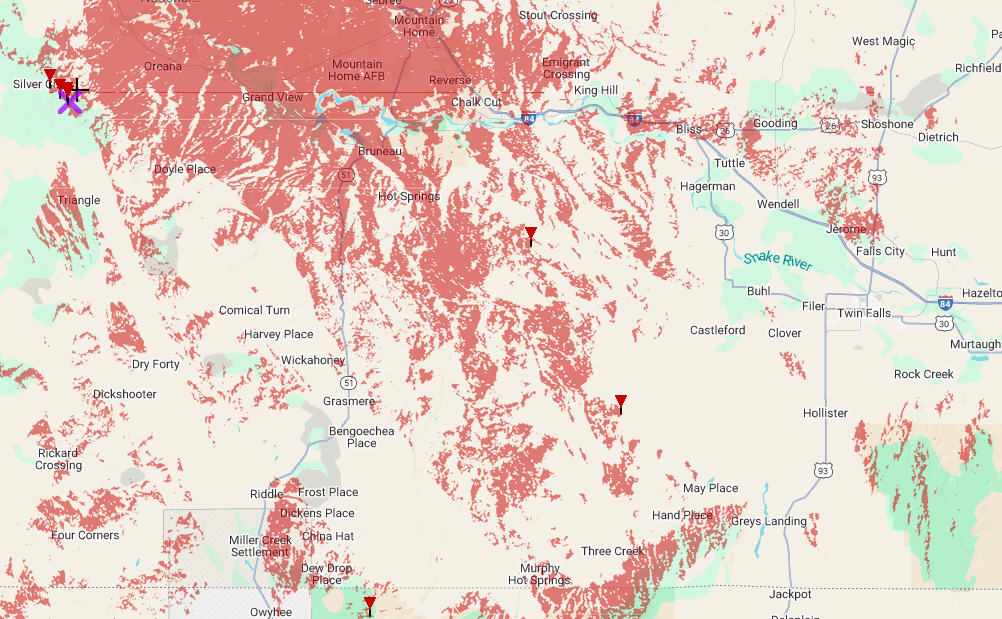
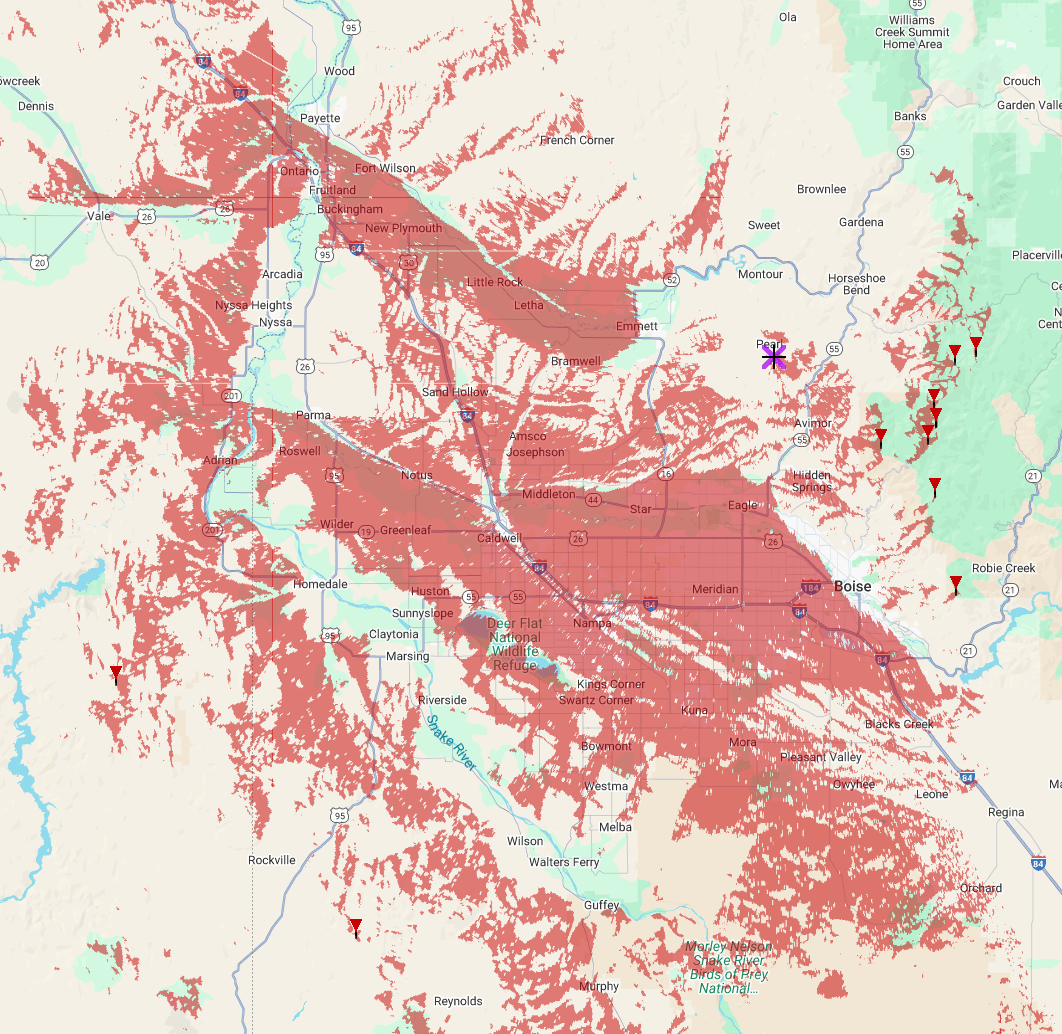
Freq51 Infrastructure
This page lists deployed routers, router lates, and strategically placed clients. Each entry has a spec table followed by a Site survey with associated images. North views are shown first when both are available.
For deployment guidelines, see Router Deployment Guide.
Table of Contents
Utah Infrastructure
Southern Idaho Infrastructure
Western Idaho Infrastructure
Utah Infrastructure
Infrastructure located within Utah.
Routers
FPR — Francis Peak Router
Location: Francis Peak (Tertiary Peak)
| Node Name | Radio | Antenna | Battery | Solar | Modem Preset | Slot | Rebroadcast Mode | Firmware |
|---|---|---|---|---|---|---|---|---|
| FPR – Francis Peak Router v5 | Femtofox CE + Baymesh 3 filter | Alfa 5 dBi Omni | 3S3P 18650 | Eco-Worthy 25W | MEDIUM_FAST | 51 | ALL | 2.6.11 |
Site survey
North

South

LMR — Lake Mountain Router
Location: Lake Mountain Radio Tower
| Node Name | Radio (modules + enclosure) | Antenna | Battery | Solar | Modem Preset | Slot | Rebroadcast Mode | Firmware |
|---|---|---|---|---|---|---|---|---|
| LAKE – Lake Mountain Rtr | RPi CM3 · Ebyte E22-900M30S · Taoglas filter · Nebra Miner Enclosure | 3 dBi | Hard-wired | N/A | MEDIUM_FAST | 51 | ALL | Latest Alpha (auto) |
Site survey
North/South

MPR — Mendon Peak Router
Location: Mendon Peak
| Node Name | Radio (modules + enclosure) | Antenna | Battery | Solar | Modem Preset | Slot | Rebroadcast Mode | Firmware |
|---|---|---|---|---|---|---|---|---|
| MPR – Mendon Peak Router | Washtastic compatable with Taoglas filter | Alfa 5dBi | 3S2P Samsung pack with balancing BMS | Dual 1.5W panels | MEDIUM_FAST | 51 | ALL | 2.7.18 |
Site survey
North
South
NPR — Nelson Peak Router
Location: Nelson Peak
| Node Name | Radio (modules + enclosure) | Antenna | Battery | Solar | Modem Preset | Slot | Rebroadcast Mode | Firmware |
|---|---|---|---|---|---|---|---|---|
| NPR – Nelson Peak Router | Nebra with 1W radio and a murata filter | 45cm gizont 7dBi | PoE Powered, GOLDENMATE 1000VA/800W Lithium UPS Battery Backup | None | MEDIUM_FAST | 51 | ALL | 2.7.13 |
Site survey
North
South

Router Lates
AUR — Aurora Uranialis
Location: Ensign Peak
| Node Name | Radio | Antenna | Battery | Solar | Modem Preset | Slot | Rebroadcast Mode | Firmware |
|---|---|---|---|---|---|---|---|---|
| AUR – Aurora Uranialis | RAK4631 + GPIO Labs ISM filter | Alfa 5 dBi Omni | 1S4P 21700 Molicel P50B (20 Ah) | 10 W | MEDIUM_FAST | 51 | ALL | 2.6.4 |
Includes BME680 telemetry every 1800 s.
Site survey
North
South
POTM — Point of the Mountain
Location: North-facing ridgeline
| Node Name | Radio | Antenna | Battery | Solar | Modem Preset | Slot | Rebroadcast Mode | Firmware |
|---|---|---|---|---|---|---|---|---|
| POTM – Router Late | RAK19003 + RAK4631 | 4 dBi | 2 × 18650 | 6 W | MEDIUM_FAST | 51 | ALL | 2.6.10 |
Site survey
North
South
STIR — Stansbury Island RTR
Location: Stansbury Island
| Node Name | Radio | Antenna | Battery | Solar | Modem Preset | Slot | Rebroadcast Mode | Firmware |
|---|---|---|---|---|---|---|---|---|
| STIR – Stansbury Island RTR | Rak 4631 + BME 680 + GPS | Alfa 5 dBi Omni | 16AH | 6W | MEDIUM_FAST | 51 | ALL | 2.7.11 |
Site survey
CBT — Cache Butte Tower
Location: Cache Butte
| Node Name | Radio | Antenna | Battery | Solar | Modem Preset | Slot | Rebroadcast Mode | Firmware |
|---|---|---|---|---|---|---|---|---|
| CBT — Cache Butte Tower | Heltec V4 | eifagur “5.8 DBi” Anteanna | House Battery | None | MEDIUM_FAST | 51 | ALL | 2.7.21 |
Site survey
Strategically Placed Clients
👽 — Alien Tower 🛸
Location: Alien Tower - Draper
| Node Name | Radio | Antenna | Battery | Solar | Modem Preset | Slot | Rebroadcast Mode | Firmware |
|---|---|---|---|---|---|---|---|---|
| 👽 — Alien Tower 🛸 | RAK4631 + GPIO Labs ISM filter | Alfa 5 dBi Omni | 3 x 18650 | 6 W | MEDIUM_FAST | 51 | ALL | 2.7.11 |
Site survey
C6C — Aurora Ceresia
Location: Hill AFB – Weber State overlook
| Node Name | Radio | Antenna | Battery | Solar | Modem Preset | Slot | Rebroadcast Mode | Firmware |
|---|---|---|---|---|---|---|---|---|
| C6C – Aurora Ceresia | RAK4631 + GPIO Labs ISM filter | Alfa 5 dBi Omni | 1S4P 21700 Molicel P50B (20 Ah) | 10 W | MEDIUM_FAST | 51 | ALL | 2.6.4 |
Site survey

WC1 — Wasatch Crest 1
Location: Silver Peak
| Node Name | Radio | Antenna | Battery | Solar | Modem Preset | Slot | Rebroadcast Mode | Firmware |
|---|---|---|---|---|---|---|---|---|
| WC1 – Wasatch Crest 1.1 | SolarXiao Base + Murata DFCB2915MLDJAA | Gizont 7dBi 45cm | 1S4P Molicel P45B (18Ah) | 6 W | MEDIUM_FAST | 51 | ALL | 2.6.11 |
Site Survey
WC2 — Wasatch Crest 2
Location: Squaretop
| Node Name | Radio | Antenna | Battery | Solar | Modem Preset | Slot | Rebroadcast Mode | Firmware |
|---|---|---|---|---|---|---|---|---|
| WC2 – Wasatch Crest 2 | XIAO NRF52 + Murata DFCB2915MLDJAA | Gizont 7dBi 45cm | 1S2P Molicel P45B (9 Ah) | 6 W | MEDIUM_FAST | 51 | ALL | 2.6.11 |
Site Survey
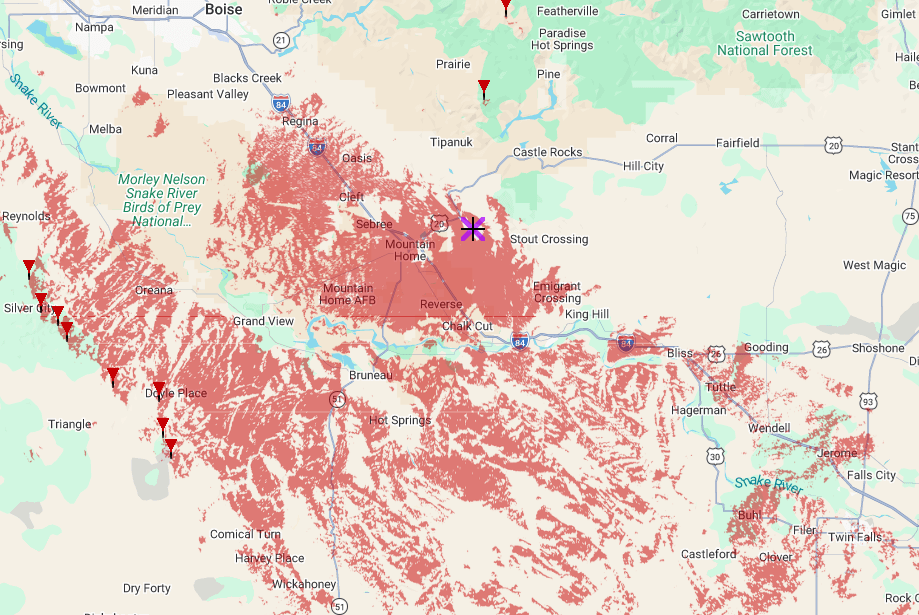
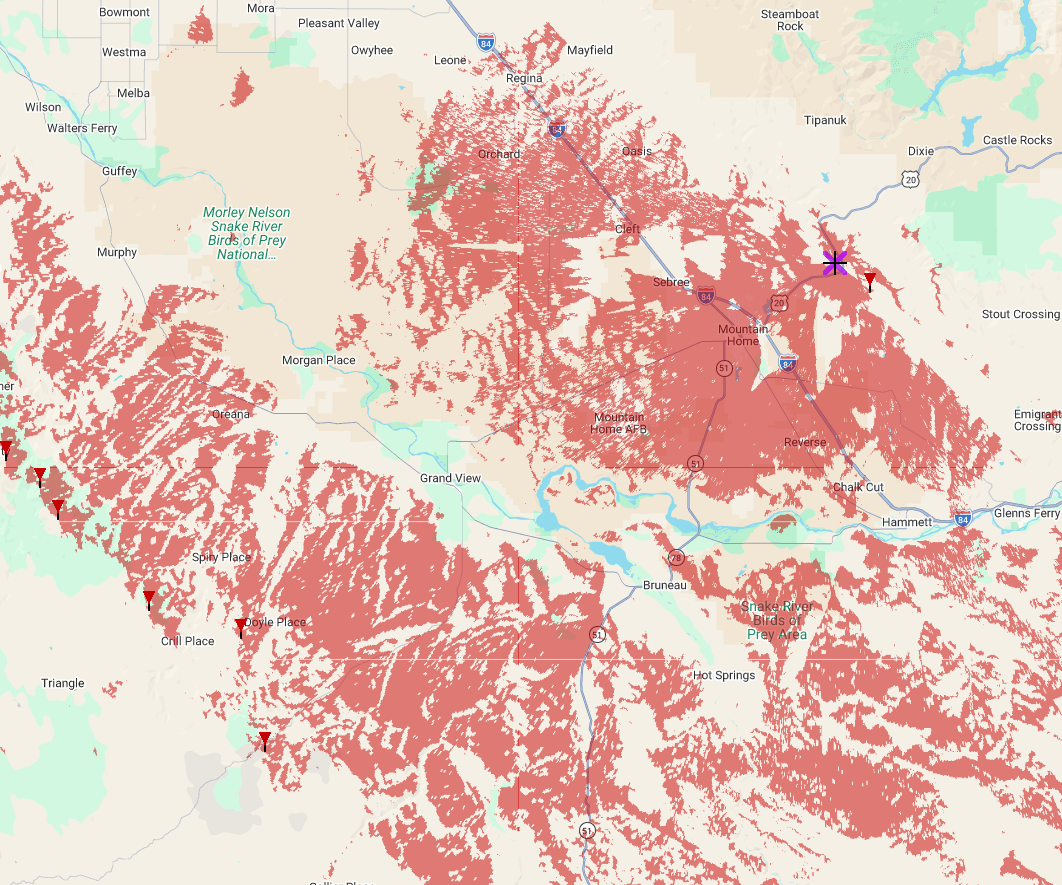
Southern Idaho Infrastructure
Infrastructure physically located within Southern Idaho west of Mountain Home through Twin Falls, Burley, and the I-84 corridor to UT.
Routers
MHR — Mount Harrison Router
Location: Mount Harrison - Southern Idaho
| Node Name | Radio | Antenna | Battery | Solar | Modem Preset | Slot | Rebroadcast Mode | Firmware |
|---|---|---|---|---|---|---|---|---|
| MHR — Mount Harrison Router | Station-G2 | Rokland 8dBi Low Profile Omni | 3S8P 12.6v 40AH | 25w 18v ECO-WORTHY | MEDIUM_FAST | 51 | ALL | 2.6 |
Site Survey
East
West
ISR — Indian Springs Router v2
Location: South Hills - Sugarloaf
| Node Name | Radio | Antenna | Battery | Solar | Modem Preset | Slot | Rebroadcast Mode | Firmware |
|---|---|---|---|---|---|---|---|---|
| ISR — Indian Springs Router v2 | RAK WisBlock 4631 + Airbuddy Amplifier | ALFA 5dbi Omni | 1S6P 3.7v 40AH | 10w 18v ECO-WORTHY | MEDIUM_FAST | 51 | ALL | 2.6.11 |
Site Survey
East
West
T2T — The 2 Towers
Location: Flat Top Butte, Jerome
| Node Name | Radio | Antenna | Battery | Solar | Modem Preset | Slot | Rebroadcast Mode | Firmware |
|---|---|---|---|---|---|---|---|---|
| T2T — The 2 Towers | wehooper4 SolarXaio Advanced + 1W | 8dBi Omni + Acasom Cavity Filter | 1S8P 3.7v 40AH | 10w 18v ECO-WORTHY | MEDIUM_FAST | 51 | ALL | 2.6.11 |
Site Survey
Strategically Placed Clients
SSL — Second Star Labs
Location: Second Star Labs, Twin Falls
| Node Name | Radio | Antenna | Battery | Solar | Modem Preset | Slot | Rebroadcast Mode | Firmware |
|---|---|---|---|---|---|---|---|---|
| SSL — Second Star Labs | Station G2 | Rokland 10dBi Backcountry | 12v 16AH LiFePo4 | 25w 18v ECO-WORTHY | MEDIUM_FAST | 51 | ALL | 2.6.11 |
Site Survey
STLR — Stellar
Location: Falls & Blue Lakes, Twin Falls
| Node Name | Radio | Antenna | Battery | Solar | Modem Preset | Slot | Rebroadcast Mode | Firmware |
|---|---|---|---|---|---|---|---|---|
| SSL — Second Star Labs | RPi Zero 2 W + 1W Wehooper Zebrahat | 8dBi Omni | N/A Grid PoE | N/A Grid PoE | MEDIUM_FAST | 51 | ALL | 2.6.11 |
Site Survey
Western Idaho Infrastructure
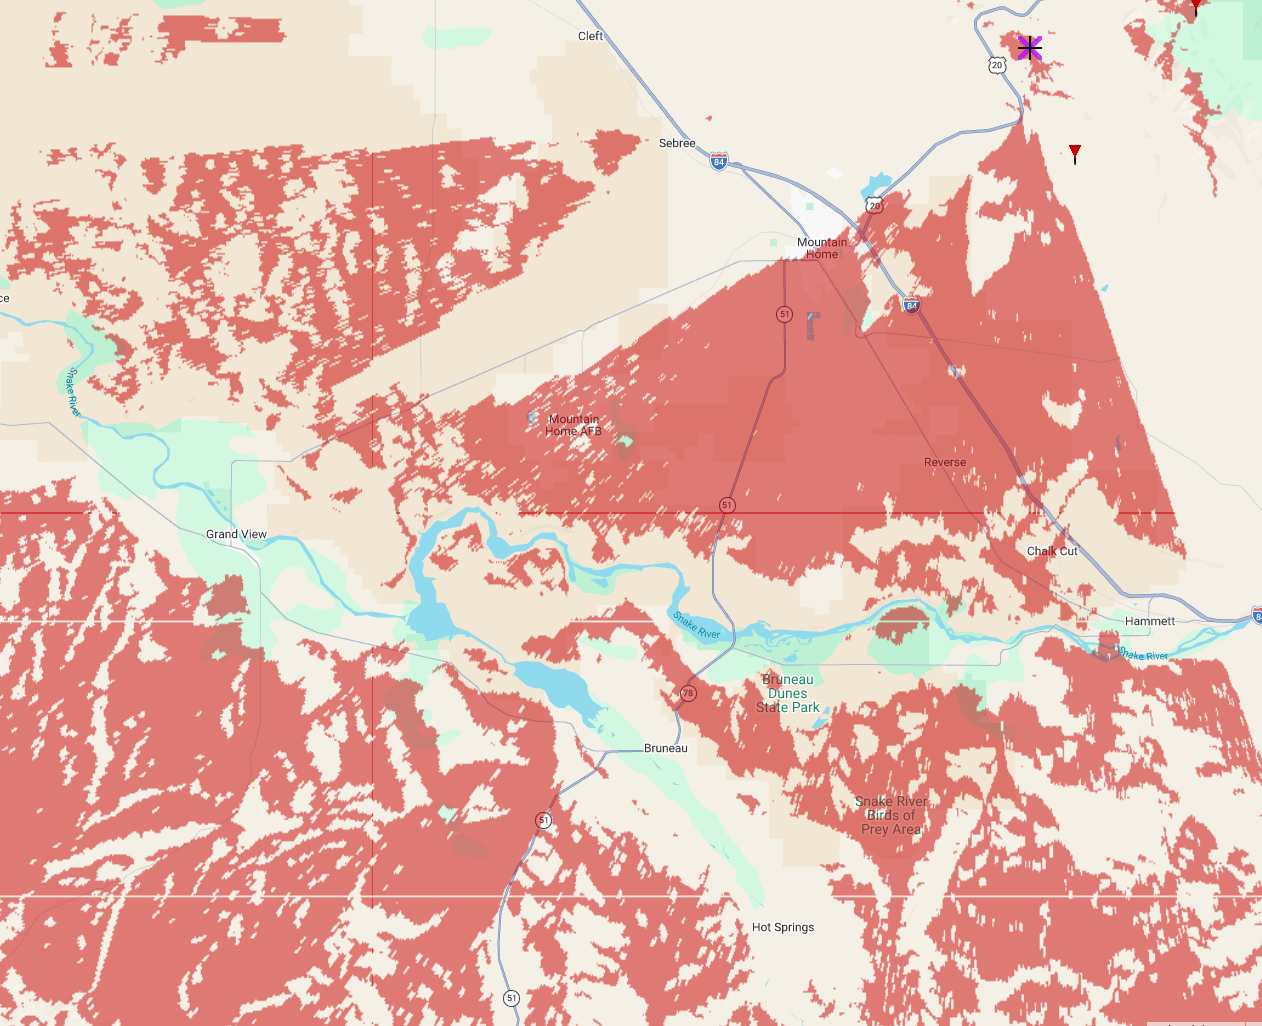
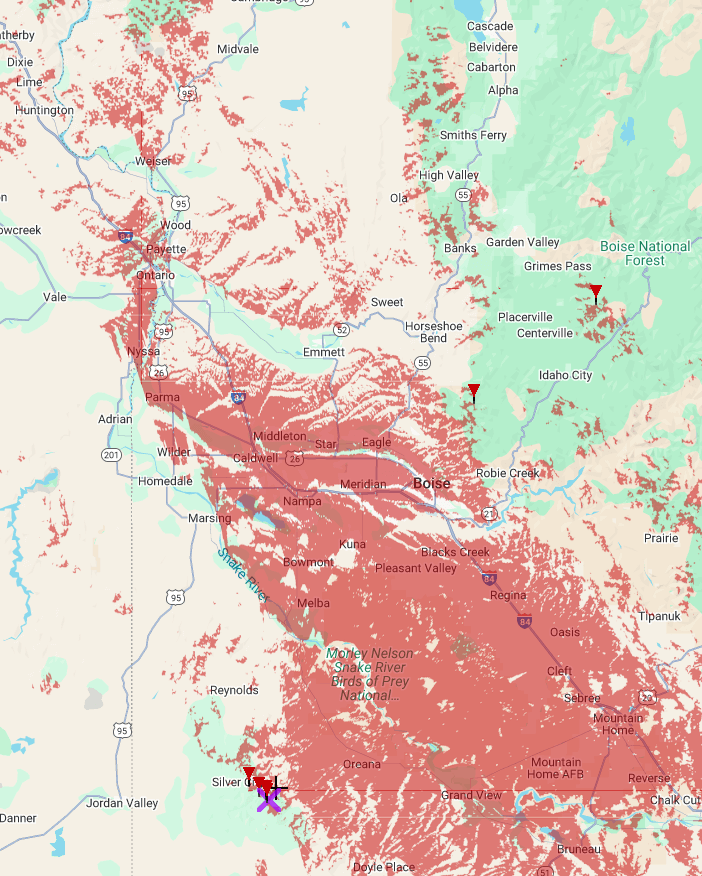
Infrastructure physically located within Western Idaho including Boise, Meridian, Nampa, Mountain Home and surrounding areas.
Mountain Home
Routers
DPR — Danskin Peak Router
Location: Danksin Peak - Mountain Home
| Node Name | Radio | Antenna | Battery | Solar | Modem Preset | Slot | Rebroadcast Mode | Firmware |
|---|---|---|---|---|---|---|---|---|
| DPR — Danskin Peak Router | RAK WisBlock 4631 + Airbuddy Amplifier | slinkdsco 5.8dBi 915MHz | 1S4P 3.7v 18650 | 10w5v Zivif | MEDIUM_FAST | 51 | ALL | 2.7.15 |
Site Survey
North
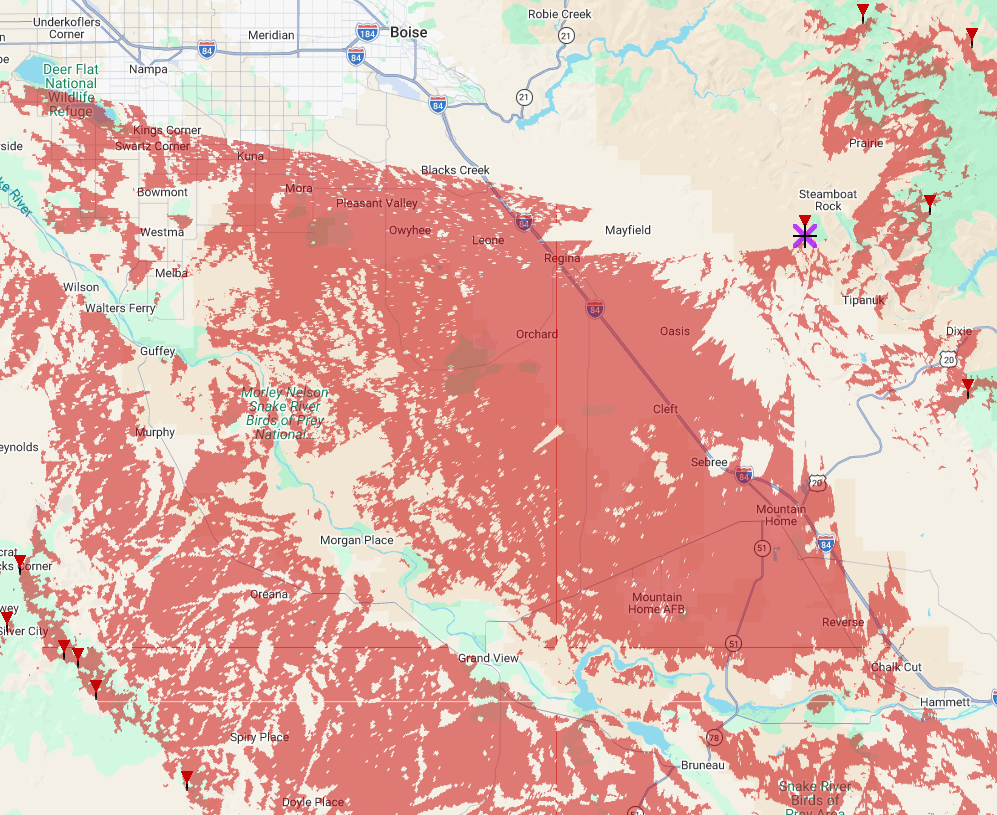
tcup — MH Teacup Foothills
Location: Teapot Dome, Mountain Home
| Node Name | Radio | Antenna | Battery | Solar | Modem Preset | Slot | Rebroadcast Mode | Firmware |
|---|---|---|---|---|---|---|---|---|
| tcup — MH Teacup Foothills | Wismesh 1W Booster | Rokland 8dBi Low Profile Omni | 3.2v LiFePo4 20AH | 15w5v Integrated Panel + Battery | MEDIUM_FAST | 51 | ALL | 2.7.15 |
Site Survey
Router Lates
RBR — Rattlesnake Butte Repeater
Location: Rattlesnake Butte, Mountain Home
| Node Name | Radio | Antenna | Battery | Solar | Modem Preset | Slot | Rebroadcast Mode | Firmware |
|---|---|---|---|---|---|---|---|---|
| RBR — Rattlesnake Butte Repeater | wehooper4 SolarXaio Advanced + 1W | slinkdsco 5.8dBi 915MHz | 3.2v LiFePo4 20AH | 15w5v Integrated Panel + Battery | MEDIUM_FAST | 51 | ALL | 2.7.15 |
Site Survey
MHR — MH Foothills Repeater
Location: Mountain Home Foothills, Mountain Home
| Node Name | Radio | Antenna | Battery | Solar | Modem Preset | Slot | Rebroadcast Mode | Firmware |
|---|---|---|---|---|---|---|---|---|
| MHR — MH Foothills Repeater | RAK4631 | slinkdsco 5.8dBi 915MHz | 3.2v LiFePo4 20AH | 15w5v Integrated Panel + Battery | MEDIUM_FAST | 51 | ALL | 2.7.15 |
Site Survey
Treasure Valley
Routers
HPR — Hayden Peak Router
Location: Hayden Peak - Boise
| Node Name | Radio | Antenna | Battery | Solar | Modem Preset | Slot | Rebroadcast Mode | Firmware |
|---|---|---|---|---|---|---|---|---|
| HPR — Hayden Peak Router | Femtofox Pro | Rokland 8dBi Low Profile Omni | 1S8P 3.7 40AH0 | 25w 18v ECO-WORTHY | MEDIUM_FAST | 51 | ALL | 2.6 |
North
TVM Pearl
Location: Treasure Valley - Pearl
| Node Name | Radio | Antenna | Battery | Solar | Modem Preset | Slot | Rebroadcast Mode | Firmware |
|---|---|---|---|---|---|---|---|---|
| TVM Pearl | RAK19007 + 4361 | 10 dBi Helium Omni | 10000 mAH Lipo 3.7 | 10w 5v | MEDIUM_FAST | 51 | ALL | 2.6.11 |
Site Survey
TVM Pearl
TVM Tablerock
Location: Treasure Valley - Tablerock
| Node Name | Radio | Antenna | Battery | Solar | Modem Preset | Slot | Rebroadcast Mode | Firmware |
|---|---|---|---|---|---|---|---|---|
| TVM Tablerock | RAK19007 + 4361 | 10 dBi Helium Omni | 10000 mAH Lipo 3.7 | 10w 5v | MEDIUM_FAST | 51 | ALL | 2.6.11 |
Site Survey
TVM Tablerock
 Return to Table of Contents
Advanced Configuration
This section contains advanced configuration guides for experienced users who want to deploy more complex setups or take on additional responsibilities in the Freq51 Intermountain Mesh network.
Available Guides
- Router Deployment Guide - Comprehensive guide for deploying router nodes
- Firmware Update Guide - Comprehensive guide for updating Node Firmware
Router Deployment Guide - Freq51 Intermountain Mesh
🎯 Overview
This guide covers everything you need to know about deploying ROUTER nodes on the Freq51 Intermountain Mesh network. Router deployment is a critical responsibility that requires careful planning, community coordination, and technical understanding.
⚠️ IMPORTANT: Router deployment should only be undertaken by experienced community members with proper coordination. Contact the Discord community before deploying any router nodes.
🏷️ Understanding Router Roles
🔄 ROUTER Role
- Purpose: Optimized for message forwarding and network infrastructure
- Behavior: Stores messages longer, prioritizes routing over local communication
- Power: Requires reliable, continuous power source
- Coverage: Should provide strategic coverage for the network
- Coordination: MANDATORY community approval required
🏠 CLIENT BASE / “STRATEGIC CLIENT” Role
- Purpose: Contributes to network without over stepping Routers
- Behavior: Acts as client with priority to favorited nodes. Can take advantage of zero hop routing
- Power: Requires reliable, continuous power source
- Coverage: Should provide strategic coverage for the network
- Coordination: Recommended community approval required
📏 Strategic Placement by Elevation
Where we place routers is very important.
🏔️ High Elevation Backbone Routers (~9,361’ - Nelson Peak Level)
Purpose: Major backbone infrastructure for maximum regional coverage
Characteristics:
- Elevation: 9,000+ feet above sea level
- Coverage: 50+ miles with clear line-of-sight
- Role: Primary ROUTER role only
- Power: Must have reliable, continuous power (solar + battery backup recommended)
- Antenna: High-gain directional and omnidirectional antennas
- Coordination: Requires extensive community planning and approval
Example Locations:
- Mountain peaks and ridges
- Tall communication towers
- Strategic high points with 360° visibility
- Existing radio infrastructure sites
Requirements:
- Community approval and coordination
- Reliable power infrastructure
- Weather-resistant housing
- Remote monitoring capabilities
- Regular maintenance access
⛰️ Regional Coverage Routers (~5,600’ - Point of the Mountain Level)
Purpose: Regional coverage bridging high backbone to local nodes
Characteristics:
- Elevation: 5,000-7,000 feet above sea level
- Coverage: 15-30 mile radius depending on terrain
- Role: ROUTER OR CLIENT_BASE
- Power: Reliable power source (grid-tied or robust solar)
- Antenna: Medium to high-gain antennas
- Coordination: Community coordination recommended
Example Locations:
- Foothills and elevated neighborhoods
- Radio towers and communication sites
- Elevated commercial/residential buildings
- Strategic overlooks and ridges
Requirements:
- Community notification and approval
- Stable power source
- Weather protection
- Basic monitoring capabilities
🏠 Local/Ground Level (25-35’ - House Roofs/Ground Level)
Purpose: Local mesh participation and user access
Characteristics:
- Elevation: Ground level to 100 feet
- Coverage: 1-5 miles in typical terrain
- Role: CLIENT or CLIENT_BASE or CLIENT_MUTE (NOT router roles)
- Why CLIENT: Prevents network congestion from too many routers
- Power: Standard residential power
Example Locations:
- Home installations
- Portable setups
- Vehicle mounts
- Temporary deployments
Key Principle: Higher elevation = greater responsibility and coordination requirements. Most users should remain clients regardless of their installation height.
🔧 Technical Requirements
Hardware Specifications
Minimum Requirements:
- Meshtastic-compatible device (RAK, Heltec, LilyGo, etc.)
- Reliable power source (grid-tied or solar with battery backup)
- Weather-resistant housing/enclosure
- Appropriate antenna for coverage area
- Network connectivity for monitoring (optional but recommended)
Recommended for High-Elevation Routers:
- Industrial-grade device with extended temperature range
- Redundant power systems (solar + battery + grid backup)
- Professional antenna installation
- Remote monitoring and management capabilities
- Lightning protection and grounding
Power Requirements
Grid-Tied Systems:
- Uninterruptible Power Supply (UPS) for short outages
- Automatic restart capability
- Power monitoring and alerts
Solar Systems:
- Sufficient panel capacity for location and season
- Deep-cycle battery bank with 3-5 day autonomy
- Charge controller with low-voltage disconnect
- Battery monitoring and maintenance access
Hybrid Systems (Recommended):
- Primary: Grid power
- Backup: Solar + battery
- Automatic switching between sources
- Remote monitoring of power status
Antenna Considerations
High-Elevation Routers:
- High-gain omnidirectional antennas (6-12 dBi)
- Directional antennas for specific coverage areas
- Professional installation with proper grounding
- Lightning protection systems
Regional Routers:
- Medium-gain omnidirectional antennas (3-6 dBi)
- Directional antennas for targeted coverage
- Weather-resistant mounting
- Proper grounding and lightning protection
Antenna Placement:
- Clear line-of-sight to target coverage areas
- Above surrounding obstructions
- Proper grounding and lightning protection
- Accessible for maintenance
📋 Pre-Deployment Checklist
Community Coordination
- Contact Discord community for approval
- Discuss placement with network coordinators
- Review coverage maps and existing infrastructure
- Coordinate with nearby router operators
- Plan maintenance and monitoring responsibilities
Technical Preparation
- Test device configuration in lab environment
- Verify power system reliability
- Test antenna performance and coverage
- Set up monitoring and alerting systems
- Prepare backup equipment and spare parts
Site Preparation
- Secure mounting location and permissions
- Install power infrastructure
- Set up weather protection
- Install lightning protection and grounding
- Test all systems before final deployment
Documentation
- Document exact location coordinates
- Record antenna height and orientation
- Document power system specifications
- Create maintenance schedule
- Set up monitoring and alerting
⚙️ Configuration Guidelines
Essential Settings
Node Configuration:
- Role: ROUTER (only after community approval)
- Node Name: Descriptive name indicating location/function
- Location: Enable GPS for accurate positioning
- Power Management: Optimize for continuous operation
Channel Settings:
- Primary Channel: Use community standard (Leave the name empty)
- Region: Set to “US”
- Frequency: 915MHz band (automatic for US region)
- Hop Limit: Set to 7
Router-Specific Settings:
- Store & Forward: Enable for message relay capability
- Neighbor Info: Enable for network mapping
- MQTT: Configure based on community guidelines
- Power Management: Disable sleep modes for continuous operation
Advanced Configuration
Network Optimization:
- Message Routing: Optimize for network topology
- Store & Forward: Configure based on coverage area
- Neighbor Discovery: Enable for network health monitoring
- Channel Utilization: Monitor and optimize as needed
Monitoring and Management:
- Remote Access: Set up secure remote management
- Logging: Enable comprehensive logging
- Alerting: Configure alerts for system issues
- Backup: Regular configuration backups
🚨 Safety and Legal Considerations
Safety Requirements
- Electrical Safety: Proper grounding and electrical installation
- Lightning Protection: Essential for elevated installations
- Fall Protection: Safe access for maintenance
- Weather Protection: Adequate housing for environmental conditions
- Fire Safety: Proper electrical installation and fire prevention
Legal Considerations
- Permits: Check local requirements for antenna installations
- Zoning: Verify compliance with local zoning regulations
- Property Rights: Ensure proper permissions for installation
- FCC Compliance: Verify device compliance with FCC regulations
- Insurance: Consider liability and equipment insurance
Environmental Impact
- Wildlife: Consider impact on local wildlife
- Visual Impact: Minimize visual impact where possible
- Noise: Ensure equipment doesn’t create noise issues
- Maintenance Access: Plan for minimal environmental disruption
🔧 Maintenance and Monitoring
Regular Maintenance Schedule
Daily Monitoring:
- Check device status and connectivity
- Monitor power system performance
- Review network traffic and performance
- Check for any error messages or alerts
Weekly Tasks:
- Review system logs for issues
- Check antenna connections and mounting
- Verify power system operation
- Update community on status
Monthly Tasks:
- Physical inspection of equipment
- Clean antennas and equipment
- Check weather protection
- Review and update documentation
Quarterly Tasks:
- Comprehensive system testing
- Update firmware if needed
- Review and optimize configuration
- Plan for seasonal changes
Monitoring Systems
Essential Monitoring:
- Device connectivity and status
- Power system performance
- Network traffic and routing
- Environmental conditions
Recommended Monitoring:
- Remote access and management
- Automated alerting systems
- Performance metrics and reporting
- Community communication channels
🆘 Troubleshooting Common Issues
Connectivity Problems
- No Network Connection: Check power, antenna connections, and device status
- Poor Coverage: Verify antenna placement and orientation
- Intermittent Issues: Check power system stability
- High Packet Loss: Review antenna and environmental factors
Power Issues
- Battery Problems: Check battery health and charging system
- Solar Issues: Verify panel output and charge controller
- Grid Power: Check UPS and power monitoring systems
- Weather Impact: Plan for seasonal power variations
Network Performance
- Routing Issues: Review network topology and configuration
- Congestion: Monitor channel utilization and optimize
- Coverage Gaps: Coordinate with community for improvements
- Interference: Identify and mitigate sources of interference
📞 Support and Resources
Community Support
- Discord: Primary support channel for router operators
- Local Meetups: In-person support and coordination
- Mentorship: Experienced operators available for guidance
- Documentation: This guide and related resources
Technical Resources
- Meshtastic Documentation: Official technical documentation
- Hardware Guides: Equipment-specific setup guides
- Configuration Examples: Community-tested configurations
- Best Practices: Lessons learned from existing deployments
Emergency Procedures
- System Failure: Rapid response procedures
- Power Outage: Backup power activation
- Weather Events: Storm preparation and recovery
- Network Issues: Coordination with community
🎯 Success Metrics
Network Health Indicators
- Message Delivery: Successful message routing rates
- Coverage Area: Effective coverage radius
- Uptime: System availability and reliability
- Network Growth: Contribution to network expansion
Community Impact
- User Connectivity: Improved access for community members
- Emergency Preparedness: Enhanced emergency communication capability
- Network Resilience: Increased network redundancy and reliability
- Knowledge Sharing: Contribution to community knowledge base
Remember: Router deployment is a significant responsibility that directly impacts the entire network. Always coordinate with the community, follow best practices, and prioritize network health over individual preferences.
For questions or support, contact the Freq51 community through Discord or local meetups. We’re here to help ensure successful router deployments that benefit the entire network.
📻 Meshtastic Firmware Update Guide
This guide provides instructions for updating firmware on various Meshtastic-compatible devices.
📑 Table of Contents
- Prerequisites
- Using the Web Flasher
- Updating RAK19007/19003 Nodes
- Updating Heltec Nodes
- Updating Seedstudio T1000E
- Over-the-Air (OTA) Updates for RAK Nodes (Advanced Users Only)
📋 Prerequisites
Before beginning any firmware update, ensure you have:
- 🔌 A USB data cable (not just a charging cable)
- 🌐 For web flasher: A compatible browser (Chrome or Edge recommended)
- 💻 For CLI updates: The latest version of the Meshtastic CLI installed
- 📥 The appropriate firmware file for your device from the Meshtastic releases page
- 🐍 For wired updates with CLI: Python 3.x and esptool
- 📱 For OTA updates: An Android device with Bluetooth capabilities
🌐 Using the Web Flasher
The easiest way to update firmware on most Meshtastic devices is using the browser-based flasher tool:
- 🔌 Connect your device to your computer using a USB cable
- 🖥️ Visit flasher.meshtastic.org in a WebUSB compatible browser (Chrome or Edge recommended)
- 📋 Select your device type from the dropdown menu:
- 🔍 Auto-detect option: The web flasher can automatically detect many common device types - look for “Auto” or “Auto-detect” at the top of the device selection dropdown
- If auto-detection doesn’t work, manually select your specific device model
- 🔄 Choose the firmware version you want to install:
- ✅ Select “Release” for stable firmware
- 🧪 Select “Alpha” for testing new features (may be unstable)
- 🎛️ Select “Custom” if you have a specific firmware file to upload
- 🔗 Click “Connect” and select your device from the popup dialog:
- On Windows: You’ll see your device listed with a COM port (e.g., “USB Serial Device (COM3)”)
- On macOS: You’ll see your device with a /dev identifier (e.g., “usbmodem1101”)
- On Linux: You’ll see your device with a /dev/ttyUSB or /dev/ttyACM identifier
- Select the appropriate device from this list
- ⚡ Click “Flash” to begin the update process:
- The screen will show detailed progress information
- 🔄 DFU Mode Prompt: Some devices may need to enter Device Firmware Update (DFU) mode during flashing
- If prompted to enter DFU mode, follow the on-screen instructions which typically involve:
- Pressing and holding specific button combinations on your device
- For most ESP32 devices: Hold the BOOT button while pressing and releasing RESET
- The web flasher will display specific instructions for your device model
- Once in DFU mode, the flashing process will continue automatically
- ⏳ Wait for the process to complete - you’ll see a progress bar and log messages
- 🎉 Once finished, your device will automatically reboot with the new firmware
Note: The web flasher requires a browser that supports WebUSB, which is currently only Chrome, Edge, and other Chromium-based browsers. Firefox and Safari are not supported.
✨ Advantages of the Web Flasher:
- 📥 No software installation required
- 🔍 Auto-detection of device types
- 🙂 User-friendly interface
- 💻 Works on Windows, macOS, Linux, and ChromeOS
- 🤖 Automatically handles bootloader mode for many devices
- 📱 Interactive guidance for entering DFU mode when needed
** Video: **
📡 Updating RAK19007/19003 Nodes
The RAK19007 and RAK19003 can be updated using the following method:
-
🔌 Connect your RAK device to your computer using a USB cable
-
🔍 Identify the correct serial port:
- Windows: Check Device Manager under Ports (COM & LPT)
- macOS: Run
ls /dev/cu.*in Terminal - Linux: Run
ls /dev/ttyUSB*in Terminal
-
🔄 Put the device in bootloader mode:
- Press and hold the BOOT button
- Press and release the RESET button
- Release the BOOT button
-
⚡ Flash the firmware using Meshtastic CLI:
meshtastic --device [PORT] --flash [PATH_TO_FIRMWARE]
Replace [PORT] with your device’s serial port (e.g., COM3 on Windows or /dev/ttyUSB0 on Linux) and [PATH_TO_FIRMWARE] with the path to your downloaded firmware file.
Alternatively, you can use esptool directly:
esptool.py --port [PORT] --baud 921600 write_flash 0x10000 [PATH_TO_FIRMWARE]
- 🔄 After flashing is complete, press the RESET button to restart the device with the new firmware.
Note: The Web Flasher method described earlier is often easier and recommended for most users updating RAK devices.
📟 Updating Heltec Nodes
Heltec devices (like the Heltec WiFi LoRa 32 V2) can be updated with these steps:
-
🔌 Connect your Heltec device to your computer via USB
-
🔍 Identify the serial port as described in the RAK section above
-
🔄 Put the device in bootloader mode:
- Press and hold both the PROG and RESET buttons
- Release the RESET button
- Release the PROG button
-
⚡ Flash the firmware using Meshtastic CLI:
meshtastic --device [PORT] --flash [PATH_TO_FIRMWARE]
Alternatively, use esptool:
esptool.py --chip esp32 --port [PORT] --baud 921600 write_flash 0x10000 [PATH_TO_FIRMWARE]
- 🔄 Press the RESET button after flashing completes.
🛰️ Updating Seedstudio T1000E
The Seedstudio T1000E follows a similar update process:
- 🔌 Connect the T1000E to your computer via USB
- 🔍 Identify the serial port
- 🔄 Enter bootloader mode (consult your device documentation for the exact button combination)
- ⚡ Flash the firmware using the Meshtastic CLI:
meshtastic --device [PORT] --flash [PATH_TO_FIRMWARE]
- 🔄 After flashing completes, reset the device.
For more detailed instructions, visit the Get Started with T1000-E Tracker
📱 Over-the-Air (OTA) Updates for RAK Nodes
⚠️ ADVANCED USERS ONLY: This procedure requires technical knowledge and carries risks including potential device bricking if interrupted. Beginners should use the Web Flasher method.
RAK devices with the RAK4631 chipset (nRF52840-based) can be updated over Bluetooth using an Android device. This method is perfect for nodes installed in hard-to-reach locations where physical access is difficult.
📲 Using the nRF Device Firmware Update App
-
📥 Install the Required App:
- Install the nRF Device Firmware Update app from the Google Play Store
-
📥 Obtain the Correct Firmware:
- Visit the Meshtastic Github Repository
- For the latest beta: Select the “Meshtastic Firmware…” link at the top
- For older versions: Select the “releases” link below that
- Download the “firmware-nrf52840-(version).zip” file to your computer
- Unzip the file and locate the “firmware-rak4631-(version)-ota.zip” file
- Transfer this file to your Android phone
-
⚙️ Configure nRF DFU App Settings:
- Open the nRF DFU app
- Go to Settings (gear icon)
- Configure the following settings (recommended by Meshtastic developers):
Packets receipt notification: On Number of packets: 5 Reboot time: 5000ms Scan timeout: 10000ms Request high MTU: Off Disable resume: Off Prepare object delay: 500ms Force scanning: Off Keep bond: On External MCU DFU: Off - These specific settings help ensure a successful update process
-
🔄 Perform the OTA Update:
- Get within Bluetooth range of your RAK node (within 2-3 meters)
- In the nRF DFU app, select the firmware file you transferred to your phone
- The app will scan for available devices
- Select your RAK node from the list of discovered devices
- Click “Start” to begin the update process
-
⏳ Update Process:
- Keep your Android device near the RAK node during the entire update
- The process may take 5-10 minutes to complete
- Do not close the app or let your phone screen turn off
- The app will display progress information during the update
- Once complete, the device will automatically reboot with the new firmware
⚠️ Important Notes for OTA Updates
- 🚨 This process is for advanced users who understand the risks involved
- 🔋 Ensure your RAK device has sufficient battery power (at least 50% recommended)
- 📶 Do not move the Android device away from the RAK node during the update
- ⚠️ Interrupting the update process may render your device unusable
- 📱 Keep your phone screen on during the entire update process
- 🔄 If the update fails, you may need to retry or fall back to the wired update method
- 🌐 This method only works with RAK devices that use the nRF52840 chipset (RAK4631-based nodes)
- 📡 The device may show as “Offline” in your mesh network during the update process
⚠️ Disclaimer: Use OTA updates at your own risk. While this method has worked for many users, we cannot guarantee it will work in all situations. If your device is mission-critical or difficult to physically access should something go wrong, consider using the more reliable wired update methods described earlier in this guide.
🔍 Troubleshooting OTA Updates
- If the update fails to start, try restarting both the node and your phone
- Ensure no other apps are connected to your Meshtastic device during the update
- If you can’t see your device in the scan list, make sure it’s powered on and within range
- For persistent issues, verify you’re using the correct firmware file specifically for OTA updates
- The OTA zip file must be the one specifically prepared for OTA updating, not the regular firmware file
For more detailed instructions, visit the PV Mesh OTA Update Guide
🔧 Troubleshooting
🚨 Common Issues and Solutions
-
🔎 Device Not Detected:
- Try a different USB cable
- Try a different USB port
- Install or update device drivers
-
❌ Flashing Fails:
- Ensure the device is in bootloader mode
- Try a lower baud rate (e.g., 115200 instead of 921600)
- Make sure you’re using the correct firmware for your device
-
📱 OTA Update Fails:
- Ensure your Android device and RAK node are close to each other
- Check that both devices have sufficient battery power
- Try disconnecting and reconnecting before attempting again
- Verify your OTA app settings match the recommended configuration
- Try disabling battery optimization for the update app
- For nRF DFU app: Make sure you’re using the correct -ota.zip file
-
🔄 Device Doesn’t Boot After Update:
- Perform a factory reset by holding the appropriate buttons for your device
- Re-flash using the wired method
-
🌐 Web Flasher Issues:
- Make sure you’re using Chrome or Edge browser
- Try different USB ports or cables
- If the device isn’t recognized, manually put it in bootloader mode
- If prompted to enter DFU mode but can’t get it to work, try manually entering bootloader mode first, then reconnect
- Clear browser cache and try again
- If auto-detection fails, try selecting your device model manually
-
🔄 DFU Mode Issues:
- If your device won’t enter DFU mode, try different button combinations
- Some devices require timing the button presses precisely
- Try disconnecting and reconnecting the USB cable before attempting again
- Check that you’re using a data-capable USB cable, not just a power cable
📚 Additional Resources
- 📖 Official Meshtastic Documentation
- 💻 Meshtastic GitHub Repository
- 👥 Meshtastic Community Forum
- 🌐 Web Flasher Tool
🔄 Last updated: 2025-09-11
💬 Freq51 Weekly Net
Welcome to the Freq51 Weekly Net — a friendly, open mesh check‑in designed to bring people together, test gear, and keep our community connected.
Whether you’re a longtime ham, a Meshtastic tinkerer, or brand new to the mesh, this is your weekly excuse to hop on and say hi.
🌐 What Is the Weekly Net?
The Weekly Net is a live Meshtastic check‑in that helps bridge the gap between ham radio operators and Meshtastic users. It gives us real insight into who’s active, how well the mesh is performing, and whether messages are actually getting through.
Think of it as a roll call — but way cooler.
📅 When It Happens
🗓 Every Wednesday
⏰ 5:00 PM – 11:59 PM (local time)
The net opens at 5:00 PM and runs through the end of the day, giving everyone plenty of time to check in — whether you’re early, late, or somewhere in between.
📡 How to Check In
Send a message on the mesh using this exact format:
(LONG NAME) - (CITY, STATE) #FREQ51
✅ Example
bashNinja - Bluffdale, UT #FREQ51
This format helps us reliably track participation and stats — so please stick to it.
🔍 Verify Your Check‑In
You can confirm your message was received by visiting:
🔗 https://meshview.freq51.net/net
Credentials:
- Username: mesh
- Password: mesh
💬 Follow Along on Discord
We also mirror the Weekly Net activity to Discord so everyone can watch the check-ins roll in — even if you’re not on the mesh at that moment.
🔗 Join our Discord: https://utahmesh.net/
📍 Channel: #mt-weekly-net
All valid NET check-ins are automatically reported in this channel, making it easy for the community to:
- 👀 See who’s active each week
- 📡 Watch the mesh light up in real time
- 🤝 Stay connected from Discord and RF at the same time
📊 NET Summary Report
A full summary of the Weekly Net — including total check-ins and activity stats — is automatically posted the next morning on Thursday at 8:00 AM.
⏰ Discord Reminders
We also offer optional reminder posts on Discord for those who opt in:
- 🌅 A reminder the morning of the NET
- 🚀 A reminder right when the NET starts at 5:00 PM
It’s an easy way to stay in the loop and never miss a check-in, whether you’re on RF, Discord, or both.
💡 For those who want to dive deeper, the Weekly Net bot commands are detailed on our Discord Commands page.
If you’re on Discord during the NET window, hop in and say hi!
🎯 Why Participate?
Checking in helps the entire network. The Weekly Net allows us to:
- 📊 Get a real count of active people (not just nodes)
- 🧪 Run regular live tests of radios, clients, and routing
- 💥 Stress test the mesh with real traffic
- 🤝 Strengthen the bridge between ham radio and Meshtastic communities
Plus… it’s just fun to see who’s out there each week.
📣 Make It a Habit
Set a reminder. Check in every Wednesday. Try new gear. Test a new antenna. Say hello from a new location.
The mesh is better when it’s used — and you’re part of what makes it work.
See you on the airwaves.
#FREQ51 🚀
Freq51 - Intermountain Mesh Emergency Communications Standards
The Intermountain Mesh spans two separate meshes: Meshtastic and MeshCore. All settings for the configuration of mesh nodes can be found in their respective locations.
Meshtastic
Channels
There are several different channels utilized and there are bots that feed alerts and data into them. All EmCom channel PSKs are empty to eliminate any confusion or accidental copying of additional characters.
| Channel | Region | Key | QR Code | Purpose | EAS Relay |
|---|---|---|---|---|---|
| emcom | Freq51 | empty |  | Mesh-wide emergency Communications channel |
Regional Channels
Utah
| Channel | Region | Key | QR Code | Purpose | EAS Relay |
|---|---|---|---|---|---|
| ec-n-ut | Northern Utah | empty |  | Regional coordinating and alerts for Northern Utah including Cache, Davis, Morgan, Rich, and Weber counties. | |
| ec-c-ut | Central Utah | empty |  | Regional coordinating and alerts for Central Utah including Salt Lake, Sanpete, Utah, and Wasatch counties. | |
| ec-e-ut | Eastern Utah | empty |  | Regional coordinating and alerts for Carbon, Daggett, Duchesne, Emery, Grand, San Juan, Summit, Uintah, and Wayne counties | |
| ec-w-ut | Western Utah | empty |  | Regional coordinating and alerts for Box Elder, Juab, Millard, and Tooele counties. | |
| ec-s-ut | Southern Utah | empty |  | Regional coordinating and alerts for Beaver, Garfield, Iron, Kane, Piute, Sevier, and Washington counties. |
Idaho
| Channel | Region | Key | QR Code | Purpose | EAS Relay |
|---|---|---|---|---|---|
| ec-n-id | Northern Idaho | empty |  | Regional coordinating and alerts for Benewah, Bonner, Boundary, Clearwater, Idaho, Kootenai, Latah, Lewis, Nez Perce, and Shoshone counties. | |
| ec-c-id | Central Idaho | empty |  | Regional coordinating and alerts for Adams, Butte, Clark, Custer, Fremont, Jefferson, Lemhi, and Valley counties. | |
| ec-sw-id | South Western Idaho | empty |  | Regional coordinating and alerts for Ada, Boise, Canyon, Elmore, Gen, Owyhee, Payette, and Washington counties. | LN:Johnnytastic SN:(JTS) SysOp: JeepnJonny |
| ec-sc-id | South Central Idaho | empty |  | Regional coordinating and alerts for Blaine, Camas, Cassia, Gooding, Jerome, Lincoln, Minidoka, and Twin Falls counties. | LN:AIDA-N2 SN:(AIDA) SysOp: Malice |
| ec-se-id | South Eastern Idaho | empty |  | Regional coordinating and alerts for Bannock, Bear Lake, Bingham, Bonneville, Caribou, Franklin, Madison, Oneida, Power, and Teton counties. |
Automated Alerting Solutions
There are many automated ways that the alerts are accessed and broadcast. Generally they come from internet connected nodes with an attached bot or other application. In some cases, there is an SDR attached to a small computer like a Raspberry Pi that takes EAS, FEMA, and iPAWS alerts straight from the airwaves. Below are details regarding the various systems in use.
MeshCore
TBD
FAQ
New User Expectations
Meshtastic is rapidly evolving, not a fully polished product. Expect quirks. For best results with a fresh device: put it somewhere with decent LOS (a window works) to mountain nodes (find the nearest on the infrastructure page) and let it run overnight. It takes time for nodes to discover each other. Users who share their position (GPS or fixed coordinates) will show up on public maps. Its a good way to test a solar setup as well.
We currently recommend a local map (TBD: map URL) for nodes that opt in to share their position. You won’t see every node—only those that choose to appear or are heard by an MQTT-uplinking node nearby.
FAQ’s
-
What firmware version should I flash?
Ask in freq51 Discord; “latest” isn’t always best for local stability. We track known issues and local norms. We currently prefer the latest Beta. Please see our firmware update guide for help on that. -
Where’s the QR/URL to join the local mesh?
We don’t recommend QR codes/URLs for public channels. They silently change additional LoRa settings (e.g., TX power, hop count). Enter channel names/keys manually and verify settings after import. -
Which role should I use: ROUTER or CLIENT?
If in doubt,CLIENTworks well. ‘CLIENT_MUTE’ is good for portable/handheld devices Router roles (ROUTER,ROUTER_LATE, etc.) rebroadcast everything they hear and can harm network health if overused or poorly placed. Use router roles only when coordinated with the group. The Comms Channel has created a great video on that.Device Roles
Meshtastic devices can take on different roles depending on how you want them to behave on the mesh. Picking the right role is important for network health. Each role has a default rebroadcast mode (how it repeats messages) which you’ll see in the apps.
-
Client
- Default role for most users.
- Sends and receives messages normally.
- Shows up on maps if you share GPS or fixed position.
- Rebroadcast mode:
All(repeats your own + direct messages when needed). - Best for semi-permanent / nodes with external antennas / have a good chance of hitting infrastructure.
-
Client Mute
- Same as Client, but does not rebroadcast messages.
- Saves battery and avoids adding unnecessary traffic.
- Still sends and receives messages for its owner.
- Best for indoor nodes or mobile nodes
- Rebroadcast mode:
Local.
-
Client Hidden
- Behaves like Client, but your node does not appear in other users’ node lists.
- Useful for privacy or stealth use-cases.
- You can still send and receive messages normally.
- Best for extremely low traffic stealthy nodes
- Rebroadcast mode:
Known Only(like Client).
-
Client Base
- Best for Roof Top Nodes and Strategic Clients.
- Sends and receives messages normally, with additional priority to favorited nodes.
- Shows up on maps if you share GPS or fixed position.
- Rebroadcast mode:
All(repeats your own nodes with priority). - Best for roof nodes for relaying indoor nodes.
-
Router
- A fixed, always-on node that rebroadcasts everything it hears.
- Extends network reach and coverage for others.
- Should only be used when:
- The node is in a good location (elevation, clear and wide Line of Sight).
- It has reliable power (mains power or solar-battery (large pack) ).
- It has a stable, high gain, preferably lightning arrested antenna setup.
- It has a filter on the RF chain
- Rebroadcast mode:
CORE_PORT_NUMS_ONLY. (we actually desire ALL so please switch. See configuration details) - Overuse of routers can cause congestion.
- See Router Deployment Guide before deploying.
-
Router Late // Currently not recommended
- A router that waits briefly before retransmitting messages.
- We have found that it is too “polite” and is not helping to contribute to the mesh as expected
- Until firmware changes not recommended. (such as Router Priority 2)
- Reduces “echo storms” when many routers are present.
- Must posses a filter on the RF chain
- Best used in dense networks with multiple routers to avoid collisions and connecting to geographically seperate areas
- Should be coordinated with other router owners.
- Rebroadcast mode:
All (delayed). - See Router Deployment Guide for placement guidance.
- A router that waits briefly before retransmitting messages.
Choosing the Right Role
- Most people - Outdoor:
Client - Most people - Indoor:
Client Mute, orClient Hidden - Fixed/always-on with power and good placement between 5500 ft and 8000 ft:
Client Base - Fixed/always-on with power and good placement above 8000 ft:
Router
See Router Deployment Guide for deployment guidance.
⚠️ Tip: Too many routers (or routers in bad spots) can hurt the mesh. When in doubt, stick to
ClientorClient Baseor ‘Client Mute’. -
Why Improperly Applying Router and Repeater Roles Is Harmful
If a poor location is chosen for Routers and Repeaters, it can cause some of these issues:
-
Increased rate of packet collisions
Because Routers, Router Lates and Repeaters always rebroadcast, when too many devices use these roles and are direct neighbors, packets will often be rebroadcast at the same time. This creates higher noise levels and packet error rates, frequently resulting in sporadic delivery failures. -
Decreased overall range
An improperly located router may prematurely consume (“hop gobble”) packets routing through it. This uses up a hop before the packet can reach strategically placed nodes. For example, if many Routers are deployed in a valley, they can consume all available hops before the packet can reach a node placed on a peak above the valley, greatly limiting range. This is exactly what occurs on frequency slot 20 which is the default preset. We have moved for this reason. Please be polite -
Asymmetrical links
Similar to decreased range, poor router placement can result in asymmetrical communication—where one part of the mesh can send messages to another group, but the reverse path fails. This happens because hops are consumed too early, blocking return messages. This is the classic hidden node problem. Users often react by increasing the hop limit to compensate, but this only worsens congestion by consuming more airtime. Your hop limit should be set to the lowest reasonable number of hops to reach your destination +1 for reliable links. If you do wish to see the entire mesh you can increase to 7 but be aware of what you are doing.
-
What’s LongFast vs LONG_FAST?
LongFast is the default channel name when using the LONG_FAST modem preset. LONG_FAST is a preset (like MEDIUM_FAST, SHORT_FAST, etc.) that bundles LoRa parameters. -
How do I know I’m connected?
Seeing other nodes in your node list is a good sign. Try a message to MediumFast or a direct message to a known node.
📖 Freq51 Meshtastic Glossary
Welcome to the Freq51 Meshtastic Glossary! This page gathers key terms you’ll see when working with Meshtastic devices, channels, and Freq51 community practices — organized A to Z.
Jump to a section: A · B · C · D · E · F · G · H · I · J · K · L · M · N · O · P · Q · R · S · T · U · V · W · X · Y · Z
A
- App / Application / Client Application — An application that connects to a Meshtastic node to send and receive messages via the mesh. See also: Client.
- Airtime (Time on Air) — The length of time a LoRa transmission occupies the channel. Longer-range settings typically increase airtime and reduce throughput.
- APRS (Automatic Packet Reporting System) — A ham radio data system sometimes bridged to/from Meshtastic by communities. Check local regulations and Freq51 guidance before use. See also: Gateway, MQTT Bridge.
B
- Band (ISM Band) — The regional frequency range for LoRa (e.g., 915 MHz, 868 MHz). Devices must operate on the correct regional band.
- Bandwidth (LoRa) — LoRa radio parameter affecting data rate and range. Included in Modem Presets.
- BLE (Bluetooth Low Energy) — Short‑range wireless link commonly used by Meshtastic apps to connect to nodes.
- Bridge — See Gateway and MQTT Bridge.
- Broadcast — A message sent to all participants on the current channel.
C
- Channel — A logical grouping defining who can communicate; includes a name, encryption, and settings.
- Channel Key — See PSK (Pre‑Shared Key).
- Client — A node used primarily for user messaging; behavior depends on the assigned Role.
- CLI (Command Line Interface) — Text-based interface (usually over USB/Serial) to configure or interact with a node.
- Coding Rate (CR) — LoRa forward‑error‑correction setting that trades speed for robustness. Included in Modem Presets.
D
- Deduplication — Logic to avoid processing or rebroadcasting the same packet multiple times. See also: Rebroadcast Logic.
- Device — A Meshtastic‑compatible radio running the Meshtastic firmware.
- Device Role — See Role.
- DFU (Device Firmware Update) — Special mode used for firmware updates.
- Direct Message (DM) — Encrypted, point‑to‑point communication using public key cryptography. See also: PKC.
E
- Encryption — Channel messages secured with a Pre‑Shared Key (PSK). Direct messages can use public key cryptography.
- ESP32 — Espressif MCU used in many devices; higher power usage than NRF52; can support Wi‑Fi.
- EUI / EIRP — Regulatory power concepts sometimes referenced for compliance. Check regional rules and Freq51 onboarding.
F
- FAQ (Freq51) — Answers to common community questions and practices.
- FEC (Forward Error Correction) — See Coding Rate.
- Firmware — Low-level software that runs on a node’s microcontroller.
- Flash / Flashing — Installing or updating firmware on a device.
- Freq51 — Community coordination around stable deployments, recommended settings, and onboarding for a healthy mesh.
G
- Gateway — A node that bridges the mesh to external systems (often via MQTT). Requires careful configuration to avoid loops and flooding.
- GPIO (General Purpose Input/Output) — Digital I/O pins for sensors, buttons, etc.
- GPS — Global Positioning System; nodes can report position as telemetry.
H
- Hop — A relay through another node.
- Hop Limit — The maximum number of hops a packet may traverse; helps control congestion and airtime.
- Hidden Client — See Role (CLIENT_HIDDEN).
I
- ID (Node ID / Long Name / Short Name) — Identifiers for a node in the mesh and UI.
- Interval (Telemetry/Position) — Frequency at which telemetry or position is sent; balance visibility with airtime usage.
J
- — (No common entry)
K
- Key (Channel Key) — See PSK (Pre‑Shared Key).
L
- LoRa — Low‑power, long‑range radio used by Meshtastic.
- LoS (Line of Sight) — A clear, unobstructed RF path through air; best link quality typically requires LoS.
- Lost and Found — See Role (LOST_AND_FOUND).
M
- Mesh Network — Decentralized network where nodes can forward messages for others.
- Modem Preset — Bundled LoRa parameters (Bandwidth, Spreading Factor, Coding Rate). All nodes must match to communicate.
Modem Presets (summary)
- SHORT_TURBO — Highest bandwidth, shortest range.
- SHORT_FAST — High speed; short range.
- SHORT_SLOW — Moderate range; fairly high speed.
- MEDIUM_FAST — Balanced speed/range.
- MEDIUM_SLOW — More range; less speed.
- LONG_FAST — Default; long range, reasonable speed.
- LONG_MODERATE — More range/airtime; slower than LONG_FAST.
- LONG_SLOW — Very high link budget; very slow data rate.
- VERY_LONG_SLOW — Slowest; very high range; high airtime.
Note: As a general community default, use LONG_FAST unless coordinated otherwise.
- MQTT / MQTT Bridge — Protocol and bridge commonly used to link the mesh to servers/services. Configure topics, filters, and rebroadcast logic carefully to prevent loops.
N
- Node — A device on the mesh that can send, receive, and relay messages.
- NRF52 — Nordic MCU used in many low‑power devices.
O
- OTA (Over‑the‑Air) — Wireless firmware update capability (device/platform dependent).
P
- Packet — A unit of data sent over the mesh.
- PKC (Public Key Cryptography) — Used for direct, end‑to‑end messages with keypairs.
- Preset — See Modem Preset.
- Protobuf — Google’s serialization format used by Meshtastic protocols.
- PSK (Pre‑Shared Key) — Channel encryption key. All nodes on a channel must share the PSK to exchange messages.
Q
- Quiet Client (Muted Client) — Client variant limiting rebroadcast/chat behavior to conserve airtime. See Role (CLIENT_MUTE).
R
- Rebroadcast — Relaying a received packet. Behavior is controlled to minimize duplicates and loops. See: Rebroadcast Logic.
- Rebroadcast Logic — Rules/filters that determine whether and how messages are relayed (including deduplication). Critical when bridging (e.g., MQTT).
- Region — Regulatory domain determining allowed frequency band and power. See: Band.
- Repeater — Coverage‑extending node that is not shown in the standard node list.
- Role (Device Role) — The behavior mode of a node on the mesh. See the overview below.
Device Roles (overview)
- CLIENT — Standard user node for sending/receiving messages.
- CLIENT_MUTE — Client with reduced chat/rebroadcast behavior to conserve airtime.
- CLIENT_HIDDEN — Client that participates without appearing prominently in lists/UIs.
- TRACKER — Focused on position reporting (GPS), minimal chat.
- LOST_AND_FOUND — Special mode for recovery/identification scenarios.
- SENSOR — Publishes sensor/system data as telemetry.
- TAK — Integrates with Team Awareness Kit features.
- TAK_TRACKER — TAK‑focused tracking (position reporting).
- REPEATER — Extends coverage; not shown in standard node lists.
- ROUTER — Extends coverage; shown in node lists.
- ROUTER_LATE — Router variant tuned for later/delayed relays.
- Router — Coverage‑extending node visible in node lists.
- ROUTER_LATE — Role variant tuned for delayed/late relaying. See Role.
- rp2040 — Raspberry Pi microcontroller used in some boards.
- RSSI (Received Signal Strength Indicator) — Measure of received signal power.
S
- RX (Receive) — Receiving data on the radio.
- Sensor — A node role or device function publishing environmental/system data.
- Serial — USB/UART link used by CLI and for flashing firmware.
- SNR (Signal‑to‑Noise Ratio) — Measure of signal clarity vs. noise.
- Spread(ing) Factor (SF) — LoRa parameter controlling chirp length; higher SF increases range and airtime, reduces data rate.
- SWR (Standing Wave Ratio) — RF measure of antenna/feedline match quality.
T
- TAK / TAK Tracker — Roles supporting Team Awareness Kit integrations, typically focused on position reporting and limited chat.
- Telemetry — Periodic transmission of sensor, GPS, and/or system metrics from a node.
- TX (Transmit) — Sending data on the radio.
U
- UART — Hardware serial interface used for logging, CLI, and debugging.
- Uplink / Downlink — Directional terms sometimes used around gateways/bridges: uplink (mesh → server), downlink (server → mesh), especially with MQTT.
V
- VERY_LONG_SLOW — See Modem Preset.
- Voltage (Battery Voltage) — Telemetry metric many nodes advertise to indicate power status.
W
- Web UI — Some devices/platforms expose a local web-based configuration/status page (varies by hardware/firmware build).
- Wi‑Fi — On supported ESP32 devices, can be used for features like MQTT bridging or a web UI.
X
Y
Z
Introduction
Running a Meshtastic mesh network can be very rewarding — but sometimes things don’t work as expected. This guide covers solutions for the most common issues encountered when setting up or operating your mesh.
Table of Contents
- 1. App Connection (Phone ↔ Node)
- 2. Not Getting Messages
- 3. Node List or Map Not Populating
- 4. Trouble Sending Messages
- 5. Low-Entropy Key / Duplicate Key Warning
- 6. GPS / Location Not Updating
- 7. Firmware Update Problems
- 8. Wi-Fi / Ethernet Bridge Issues
- Final Checks & Best Practices
1. App Connection (Phone ↔ Node)
Symptoms:
- The Meshtastic app (Android or iOS) won’t connect via Bluetooth, Wi-Fi, or USB.
- The device connects, then drops quickly.
Common Causes & Fixes:
- ✅ Bluetooth off or stale pairing: Turn Bluetooth off/on, forget the node, then re-pair.
- ✅ Node in wrong mode: Disable Wi-Fi if it prevents Bluetooth connection.
- ✅ Firmware mismatch: Update firmware and app.
- ✅ Power or USB cable issue: Use a data-capable cable.
- ✅ Corrupted pairing data: Reboot devices after unpairing.
Tips:
- Connect via USB and CLI (
meshtastic --info) for diagnostics. - Check Android/iOS install docs for platform-specific troubleshooting.
2. Not Getting Messages
Symptoms: Messages don’t appear; “sent” shows no acknowledgment.
Fixes:
- Ensure nodes share same region, channel, and key.
- Verify antenna connection and placement.
- Check for connectors for tightness. Replace ipex pigtail Amazon
- Move nodes closer to test connectivity.
- Check logs for LoRa errors or low RSSI/SNR.
- Restart app if cache issues suspected.
Tips: Place nodes outdoors with minimal obstructions; use “Range Test” mode.
3. Node List or Map Not Populating
Symptoms: Node list shows only your node; map empty.
Fixes:
- Enable “Position Broadcasting.”
- Confirm GPS (see section 6).
- Verify primary channel matches other nodes.
- Ensure MQTT/HTTP uplink configured for public maps.
- Verify antenna connection and placement.
- Check for connectors for tightness. Replace ipex pigtail Amazon
Tips: Wait a few minutes; inactive nodes expire on some firmware versions.
4. Trouble Sending Messages
Symptoms: Messages remain unsent or show “Error.”
Fixes:
- Verify destination node ID/alias.
- Ensure router nodes forward correctly.
- Match region and LoRa parameters.
- Test broadcast messages first.
- Reboot sender and receiver.
- Verify antenna connection and placement.
- Check for connectors for tightness. Replace ipex pigtail Amazon
Tips: Use CLI (meshtastic --sendtext "test") for reliable testing.
5. Low-Entropy Key / Duplicate Key Warning
Symptoms: Warning about low-entropy key.
Cause: Weak or duplicate X25519 key pair from older firmware or cloned hardware.
Fixes:
- Update to firmware 2.6.11+.
- Generate new keys:
- Via app: Node Settings → Security / Keys → Generate new key pair.
- Via CLI:
meshtastic --export-config > backup.json meshtastic --factory-reset-device - Re-pair and rejoin channel.
Tips: Broadcast post-key regeneration; avoid restoring pre-2.6.11 backups; use official firmware only.
6. GPS / Location Not Updating
Symptoms: No GPS fix; map shows (0,0).
Fixes:
- Place outdoors with clear sky.
- Ensure GPS antenna connected.
- Check power stability.
- Verify external GPS pin mapping.
- Reboot and wait for cold start fix.
Tips: CLI check: meshtastic --info | grep GPS; move node 10 ft after first lock.
7. Firmware Update Problems
Symptoms: Node won’t boot; app shows “Firmware mismatch.”
Fixes:
- Use official Meshtastic Flasher or
esptool.py. - Select correct board type.
- Hold BOOT button during USB plug-in if flash fails.
- Re-flash and verify firmware matches hardware.
Tips: Avoid restoring old configs onto new firmware; use --erase if corruption suspected.
8. Wi-Fi / Ethernet Bridge Issues
Symptoms: Node connects to Wi-Fi but can’t reach MQTT; messages don’t forward.
Fixes:
- Verify broker URL, username, and password.
- Ensure network allows outbound ports (1883/443).
- Reboot router/node after changes.
- Check logs for MQTT errors.
- Avoid loops with multiple bridges.
Tips: Use static IPs; test credentials with separate MQTT client first.
Final Checks & Best Practices
- Keep firmware and apps updated.
- Use quality antennas and clear line-of-sight mounting.
- Verify region, channel, and key consistency.
- Backup configuration:
meshtastic --export-config. - Factory-reset after major updates or persistent bugs.
- Monitor network for warnings or unusual behavior.
- Verify antenna connection and placement.
- Check for connectors for tightness. Replace ipex pigtail Amazon
Last updated: October 2025
Contact Us
Have questions, need help, or want to get involved in the mesh? We’re here for you!
🆘 Getting Help
- Discord: Official Meshtastic Discord → Connect Forum → US-Utah
- Discord: Intermountain Mesh
Thanks for being part of the network — happy meshing!
Freq51 Discord Server
Join the community:
👉 https://utahmesh.net/
The Freq51 Discord server is the central hub for our community mesh network. It’s where we plan, experiment, and collaborate on real-world RF-based communication using Meshtastic.
New Members & Onboarding
When you join the Freq51 Discord server, we guide you through a simple onboarding process to get set up and connected to your community.
-
Select Your Region
You will be prompted to select the region you live in (Utah or Idaho). This helps with local coordination and Weekly Net participation. Available regions:Idaho
- Northern: Benewah, Bonner, Boundary, Clearwater, Idaho, Kootenai, Latah, Lewis, Nez Perce, Shoshone
- Central: Adams, Butte, Clark, Custer, Fremont, Jefferson, Lemhi, Valley
- South Western: Ada, Boise, Canyon, Elmore, Gem, Owyhee, Payette, Washington
- South Central: Blaine, Camas, Cassia, Gooding, Jerome, Lincoln, Minidoka, Twin Falls
- South Eastern: Bannock, Bear Lake, Bingham, Bonneville, Caribou, Franklin, Madison, Oneida, Power, Teton
Utah
- Northern: Cache, Davis, Morgan, Rich, Weber
- Central: Salt Lake, Sanpete, Utah, Wasatch
- Eastern: Carbon, Daggett, Duchesne, Emery, Grand, San Juan, Summit, Uintah, Wayne
- Western: Box Elder, Juab, Millard, Tooele
- Southern: Beaver, Garfield, Iron, Kane, Piute, Sevier, Washington
Other
- Just Visiting The Area: For those passing through Idaho or Utah
-
Purpose Question
You’ll be asked if you are here for Meshtastic or MeshCore participation. This helps route your notifications and relevant channels. -
Weekly Net Notifications
You will have the option to opt in to receive reminders for the Weekly Net, including start-time notifications and follow-up summaries.
This process ensures everyone is set up for participation and can engage with the right region and mesh type.
About Freq51
The Freq51 community is building an open community mesh that anyone can join.
This network is designed as a radio-frequency communication tool for:
- Emergency and disaster response
- Off-grid (non-internet) coordination
- Experimentation and hobbyist projects
- Learning and collaboration around mesh networking
No radio license is required to use Meshtastic, making it accessible to newcomers and experienced operators alike.
Whether you’re here to experiment, support emergency preparedness, or explore mesh networking, you’re welcome.
What You’ll Find on Discord
Inside the Discord server, you’ll find:
- Weekly Net coordination and reminders
- Live reporting during the Weekly Net
- Check-ins, stats, and summaries
- Node ownership and tracking
- Technical discussion and troubleshooting
- Community announcements and updates
Many of these features are powered by our custom Freq51 Discord Bot.
Freq51 Discord Bot
The Discord bot supports the Weekly Net and general mesh activity by tracking node check-ins, ownership, and participation over time. It helps answer questions like:
- When did I check in?
- Which nodes are associated with me?
- How consistent has my participation been?
- How do I compare on the leaderboard?
Available Bot Commands
MeshDrone Commands:
- ~ant – Freq51 Recommended Antennas
- ~config – Freq51 Config Tool
- ~cov – Freq51 Coverage Map
- ~help – Provides template for support
- ~hopwatch – Mesh hop channels
- ~infra – Freq51 Infrastructure
- ~fq51 – Freq51 Website
- ~regions – Discord Regions map
- ~migrate – Freq51 Migrate page
- ~mv – Freq51 Meshview site
- ~on – Freq51 On-Boarding link
- ~loss – Coax Line loss
- ~ma – Freq51 Malla site
- ~mqtt – Freq51 MQTT sites.
- ~pihat – Links to Pi-Hat hardware
Role Config Guides:
- ~client – Freq51 Client Role Settings
- ~mute – Freq51 Client Mute Role Settings
- ~hide – Freq51 Client Hidden Role Settings
- ~router – Freq51 Router Role Settings
- ~late – Freq51 Router Late Role Settings
Weekly-Net Commands:
- /mycheckins – See your recent check-ins! Only shows nodes assigned to your Discord username.
- /usernodes – Get a list of all nodes assigned to you.
- /checkinsbydate – Lists all Weekly-Net check-ins by node for a specific date. Shows each node that reported in on that date, along with time and owner.
- /claimnode - Allows you to self assign/claim a node owned by you.
- /mystreaks - Shows your checkin streaks
- /streakleaderboard - Shows the current leaderboard of checkins.
HWT Commands
- /hwt - Will give a link you can check RF based on the lat/lon cords provided.
Weekly Net Integration
The Discord bot plays a key role during the Freq51 Weekly Net by:
- Recording node check-ins during the net
- Posting live activity updates
- Generating participation summaries
- Tracking long-term engagement and streaks
For full details on the Weekly Net schedule, reminders, and summaries, see:
👉 Weekly Net Check-ins